Explore Octory
We strongly suggest that you start by reading the Getting Started before starting this tutorial as we will not explain the core concepts of Octory.
Octory can be used in several ways in your environment:
- As a display screen to guide your user into doing some configurations.
- As a menu bar item to always have relevant info at hand.
- As an onboarding workflow to create a great first experience.
Addressing all of them in this tutorial would be too long so we will focus on one (Onboarding). Everything that you will learn here can be applied to all workflows and configurations to design the Octory configuration of your dreams.
In this tutorial you will create a basic onboarding workflow from scratch.
You will learn to:
- Customize the window
- Create multiple slides, containers and components
- Export user inputs
- Monitor applications
This tutorial will not address deployment to MDM. Refer to the Deployment section to deploy your configuration.
In this tutorial, we will be using a Plist editor software to build our configuration. If you prefer using a code editor to create your XML file, this is completely possible. The final configuration in the XML format can be found at the end of this tutorial.
Initial setup
Your first job is to follow the installion steps in Getting Started. As everything is detailed in that section, we will not go over it again here.
As a result, you will have a properly configured Octory with a minimal configuration file.
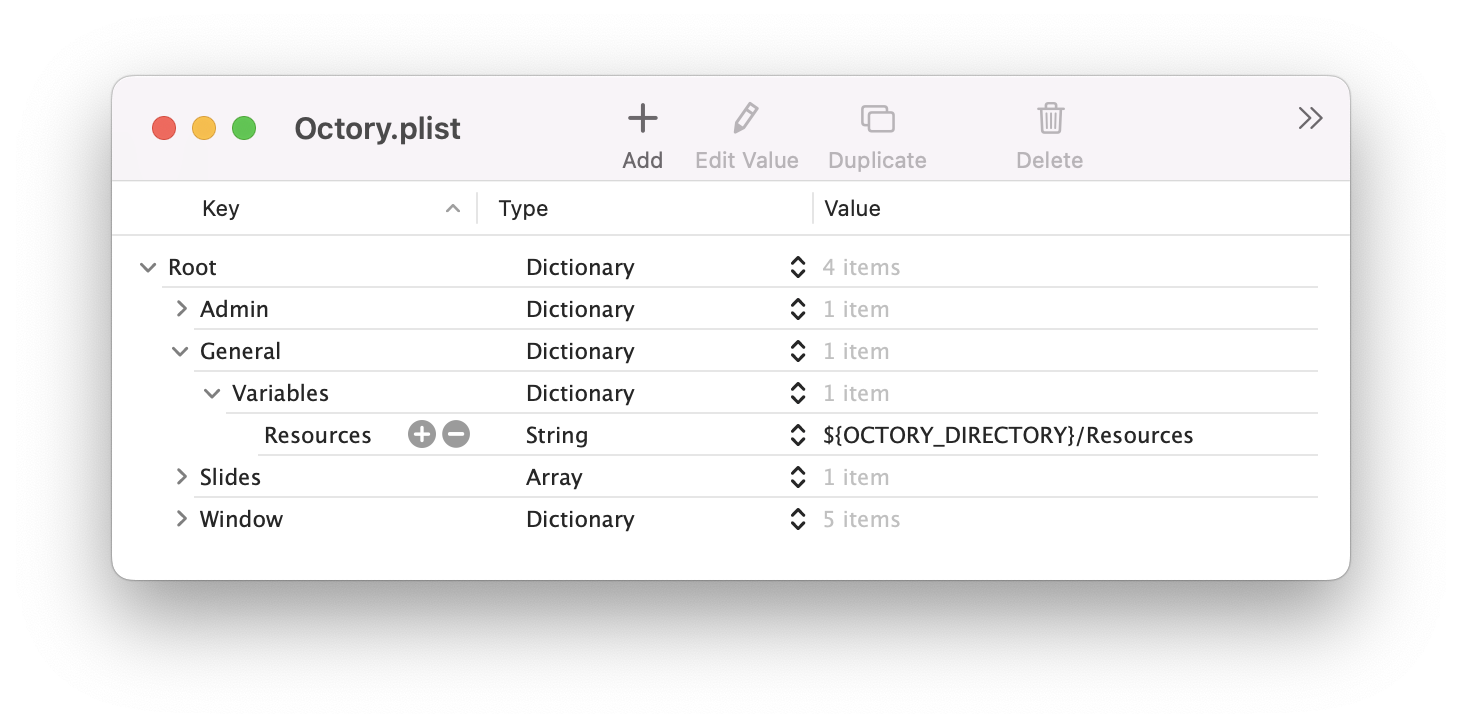
We will now create a resource folder to store all your images and scripts. Navigate to /Library/Application Support/Octory and create the architecture of your resource folder.
Here is a picture of your what your Octory folder should look like.
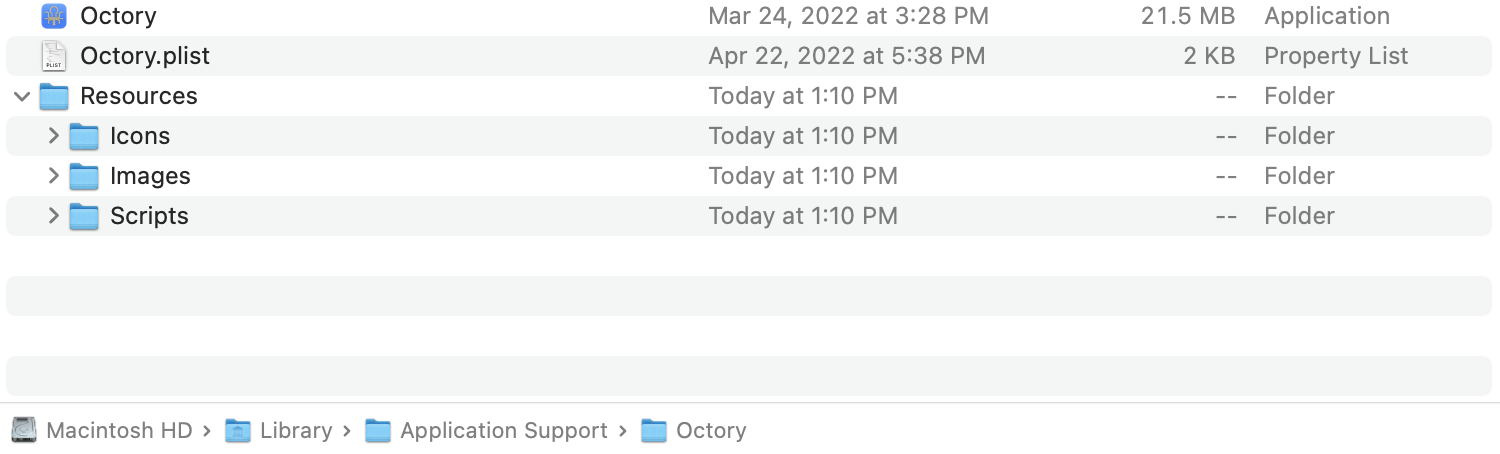
If we look at it from the Terminal app, here is what you should have:
my_local_user@Demo-MacBook-Pro Octory % ls -l
drwxr-xr-x  3 root           wheel       96 24 Mar 15:28 Octory.app
-rw-r--r--@ 1 my_local_user  admin     2332 22 Apr 17:38 Octory.plist
drwxr-xr-x  6 my_local_user  admin      192 26 Apr 13:10 Resources

my_local_user@Demo-MacBook-Pro Octory % cd Resources
my_local_user@Demo-MacBook-Pro Octory % ls -l
drwxr-xr-x  2 my_local_user  admin  64 26 Apr 13:10 Icons
drwxr-xr-x  2 my_local_user  admin  64 26 Apr 13:10 Images
drwxr-xr-x  2 my_local_user  admin  64 26 Apr 13:10 Scripts
Note the ownership and permissions of all the folders we created. If yours are different, make sure to change the permissions using chown and chmod commands.
chown -R "`whoami`":admin Resources
chmod -R 755 Resources
Define the window settings
Let's now modify the Octory.plist file we created previously.
To ease our test, we will run Octory in what we call "Simple" mode. It will open Octory as a simple window so we will still be able to access our desktop if needed.
For our configuration we want:
- Octory to be a simple window
- The title bar to be hidden
- The window to not be movable
- Octory at the center of the screen
- The window size to be 640x1024
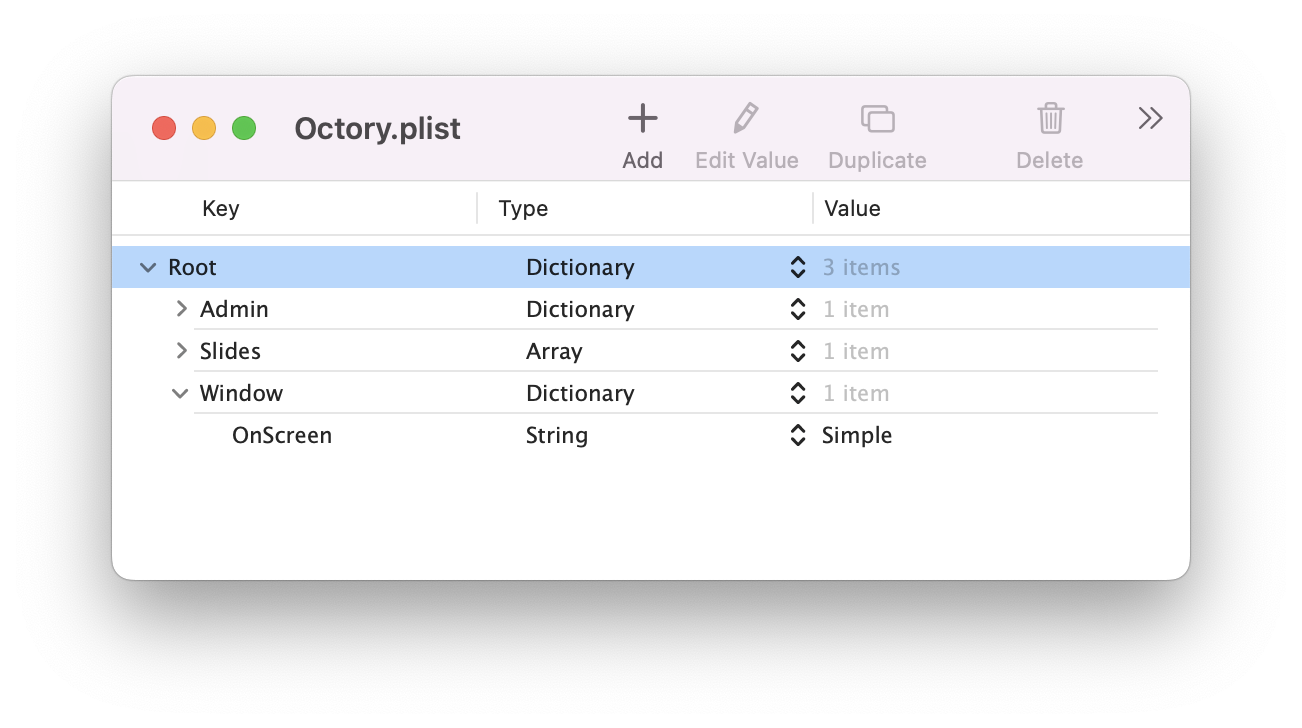
In order to change the window behavior, we want to have a look at the OnScreen key.
If you followed Getting Started→Installation you will see that your configuration already have the OnScreen key with the Simple value as it is part of the minimum requirement for Octory to launch.
If you want to lock your users in Octory, you can change the OnScreen key to BlurredBackground which will lock the users inside Octory and force them to go through the process before being able to access the desktop.
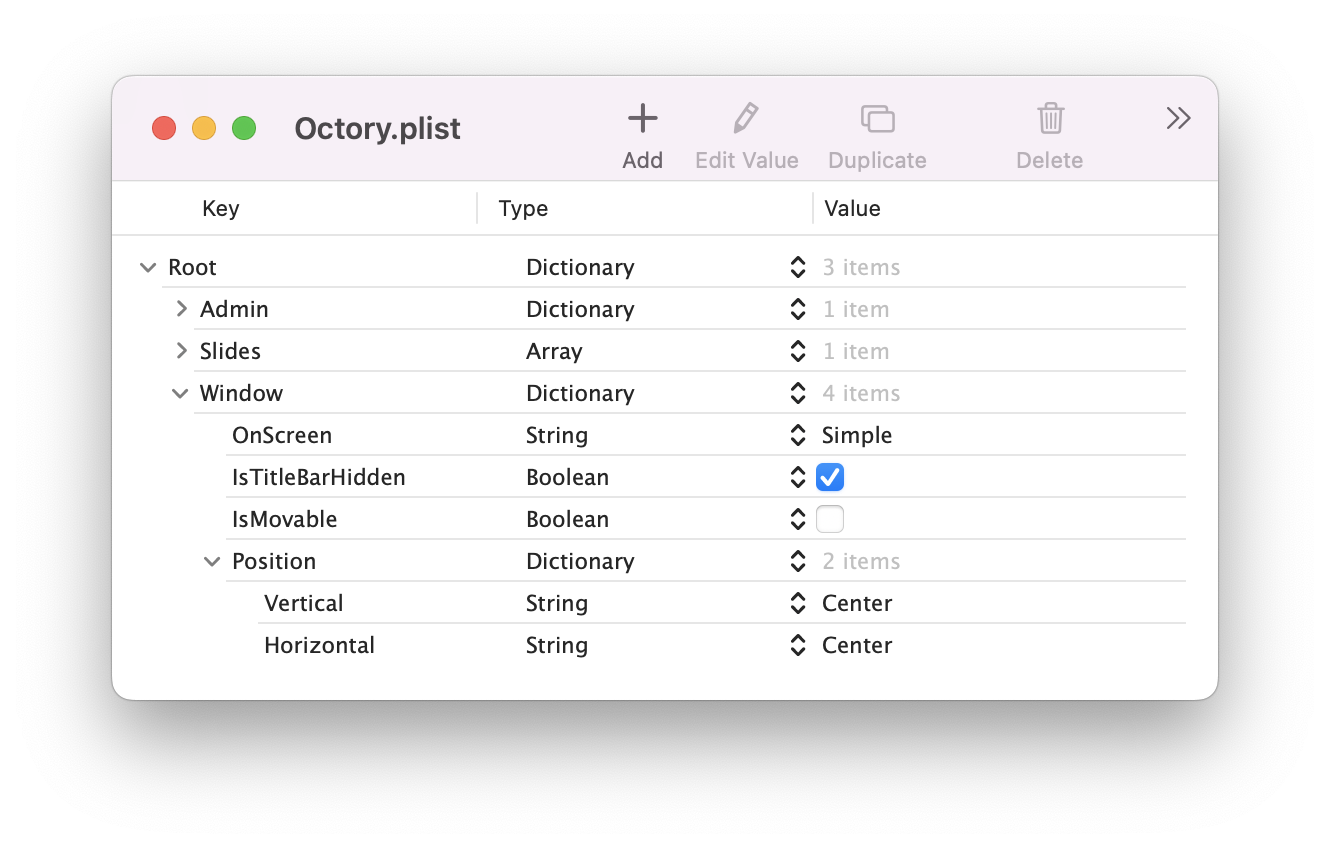
Hiding the title bar and making sure that the user cannot move the window in simple mode is done using the IsTitleBarHidden and IsMovable keys. Both keys are Boolean. If not added to your configuration, their default value will be used. In our case, we want to change the default value to match our expected behaviour.
- Add
IsTitleBarHiddenwith value to true - Add
IsMovablewith value to false

By default Octory will center the window but better be safe than sorry. Positionning the window within the screen is done using the Position dictionary which should include the Vertical and Horizontal keys.
- Add the
Positiondictionary - Add the
Verticalkey and give it the value Center - Add the
Horizontalkey and give it the value Center
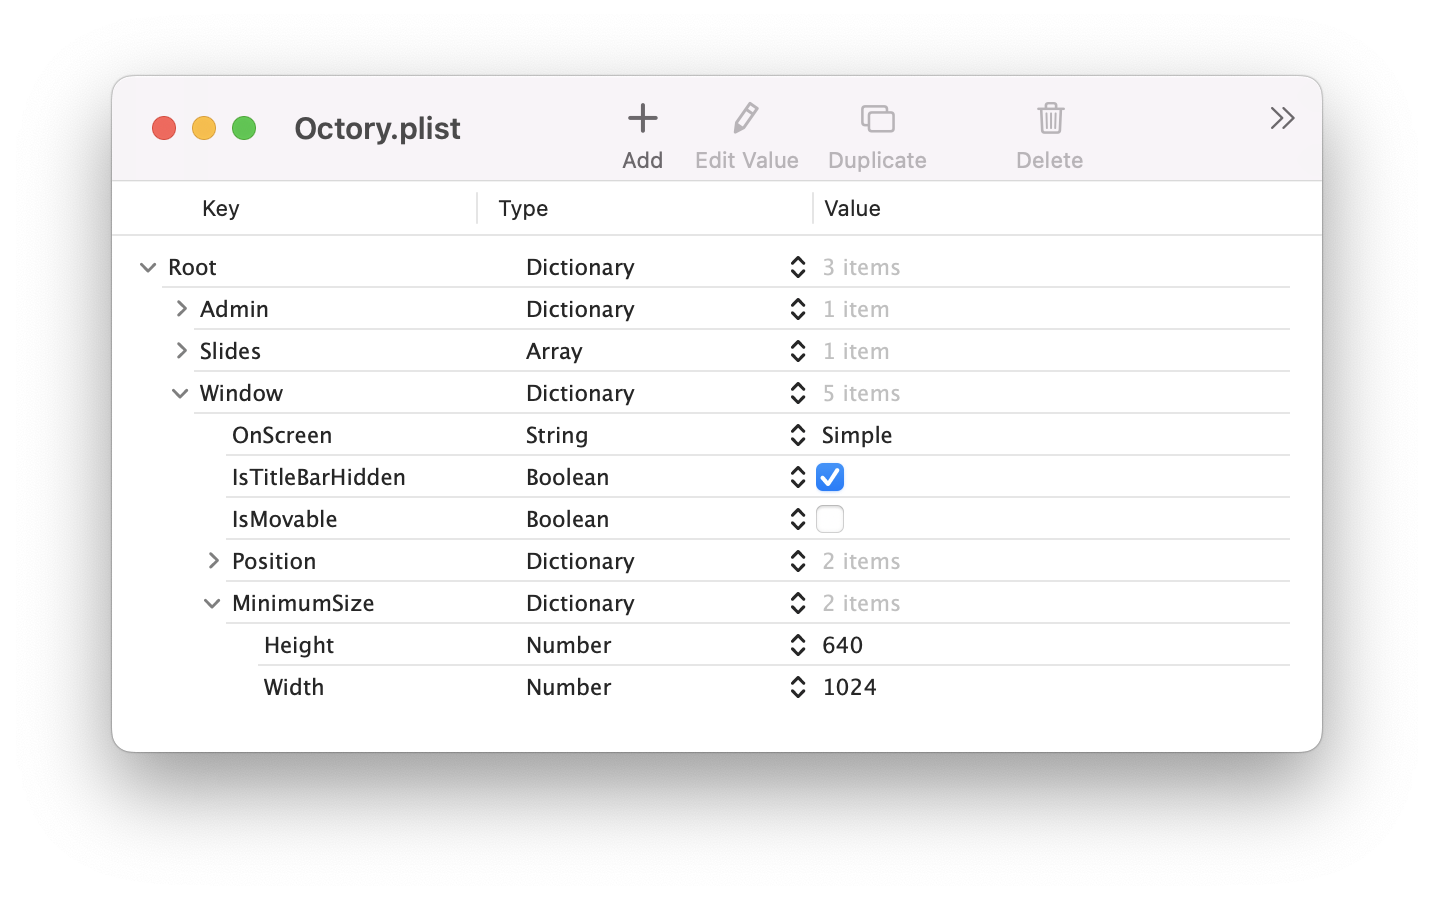
To finish with our Window configuration, we are now going to set the MinimumSize dictionnary which both include an Height and Width key. Those values will be used to size the window.
- Add the
MinimumSizedictionary - Add the
Heightkey with value 640 - Add the
Widthkey with value 1024
When your title bar is not hidden, you can also add a MaximumSize dictionary. Having both MinimumSize and MaximumSize will allow the user to resize the window within the specified limits.
If you want to see what we have been building so far, do not hesitate to launch Octory. As a reminder, you can launch Octory using:
open Octory.app
or
/Library/Application\ Support/Octory/Octory.app/Contents/MacOS/Octory
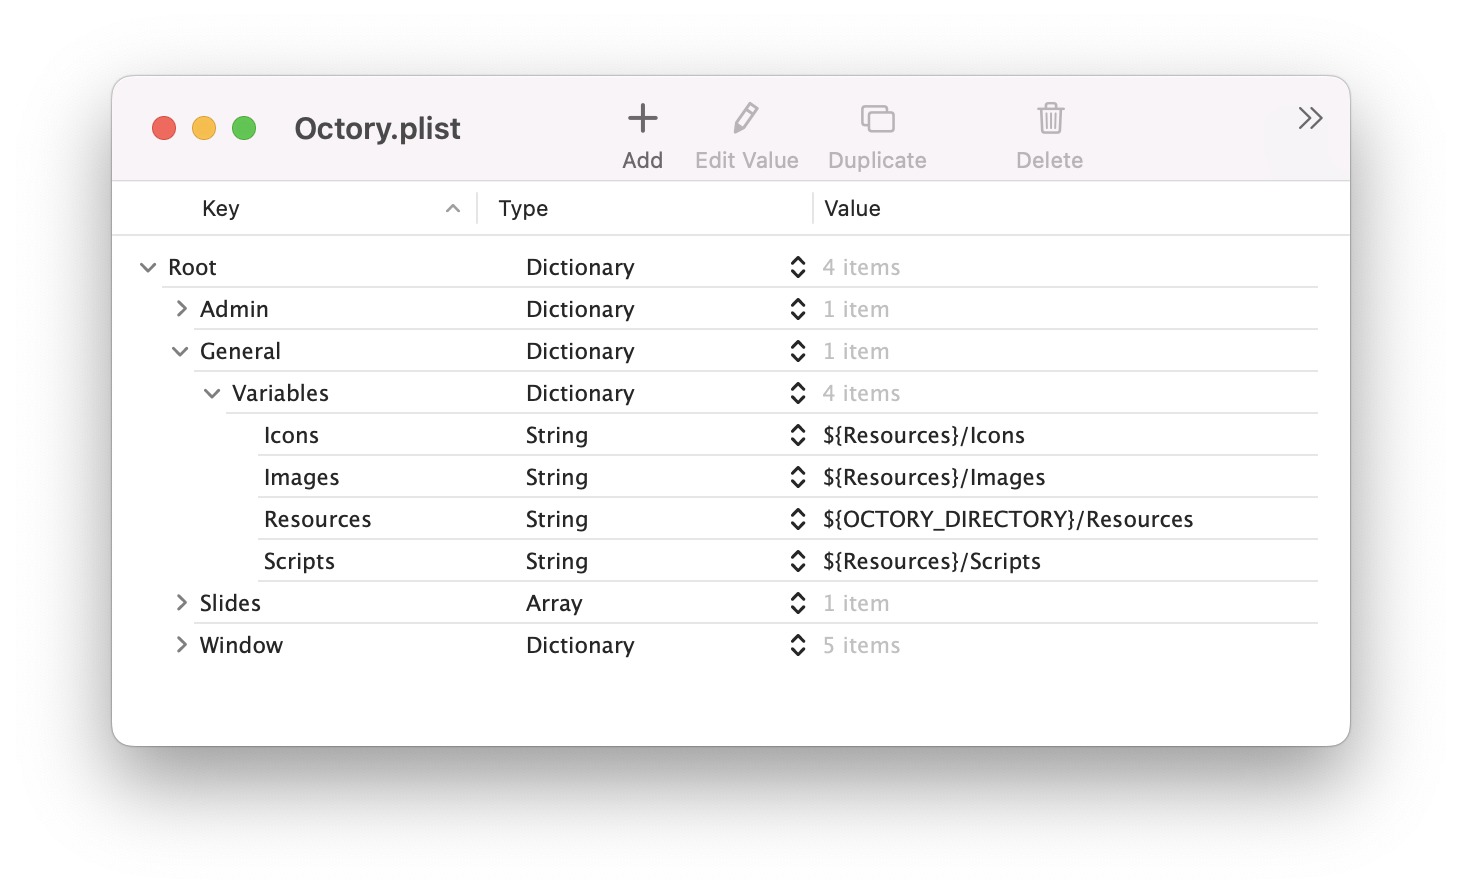
Create our variables
The next topic we want to address is the creation of our variables.
- Create four variables (Resources, Images, Icons, Scripts)
We previously created multiple resource folders and we now want to map them easily in our configuration file as writting /Library/Application\ Support/Octory/Resources/Images/myImage.png could be unefficient.
For that purpose, we will start by creating the variable for our main Resource folder using Octory's global variable ${OCTORY_DIRECTORY} which automatically fetch the folder of our Octory.app.
We will then use the newly created ${Resources} variable to map all our other folders as per the image below:
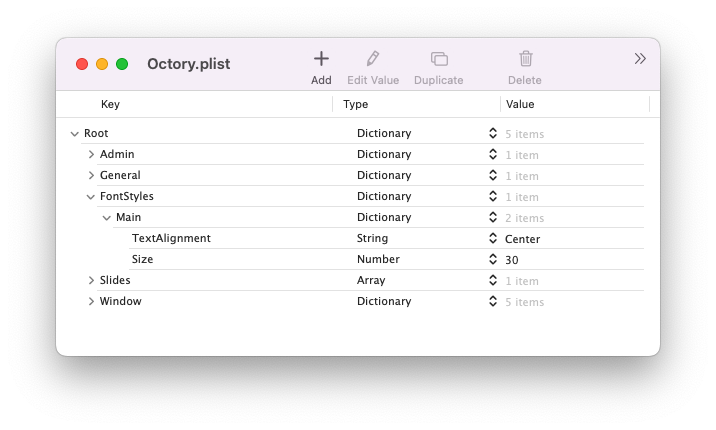
Create a font style
For our test, we want our text to be centered in all slides. Instead of defining this on each text component, we want will create a Font Style which will allow us to re-use our style throughout the slides.
- Create a font style named Main, size 30, centered
Let's add a new FontStyles dictionary to our configuration file. The name of the style has to match the name of a dictionary under FontStyles. In our case, we will have a Main dictionary with the wanted properties. All the properties of a style can be found here if needed.
Design our slides
We finished our main configuration. It is time to create and design our slides.
If you want to understand the layout of Octory's interface, refer to Understand the interface in the Getting Started section.
First slide
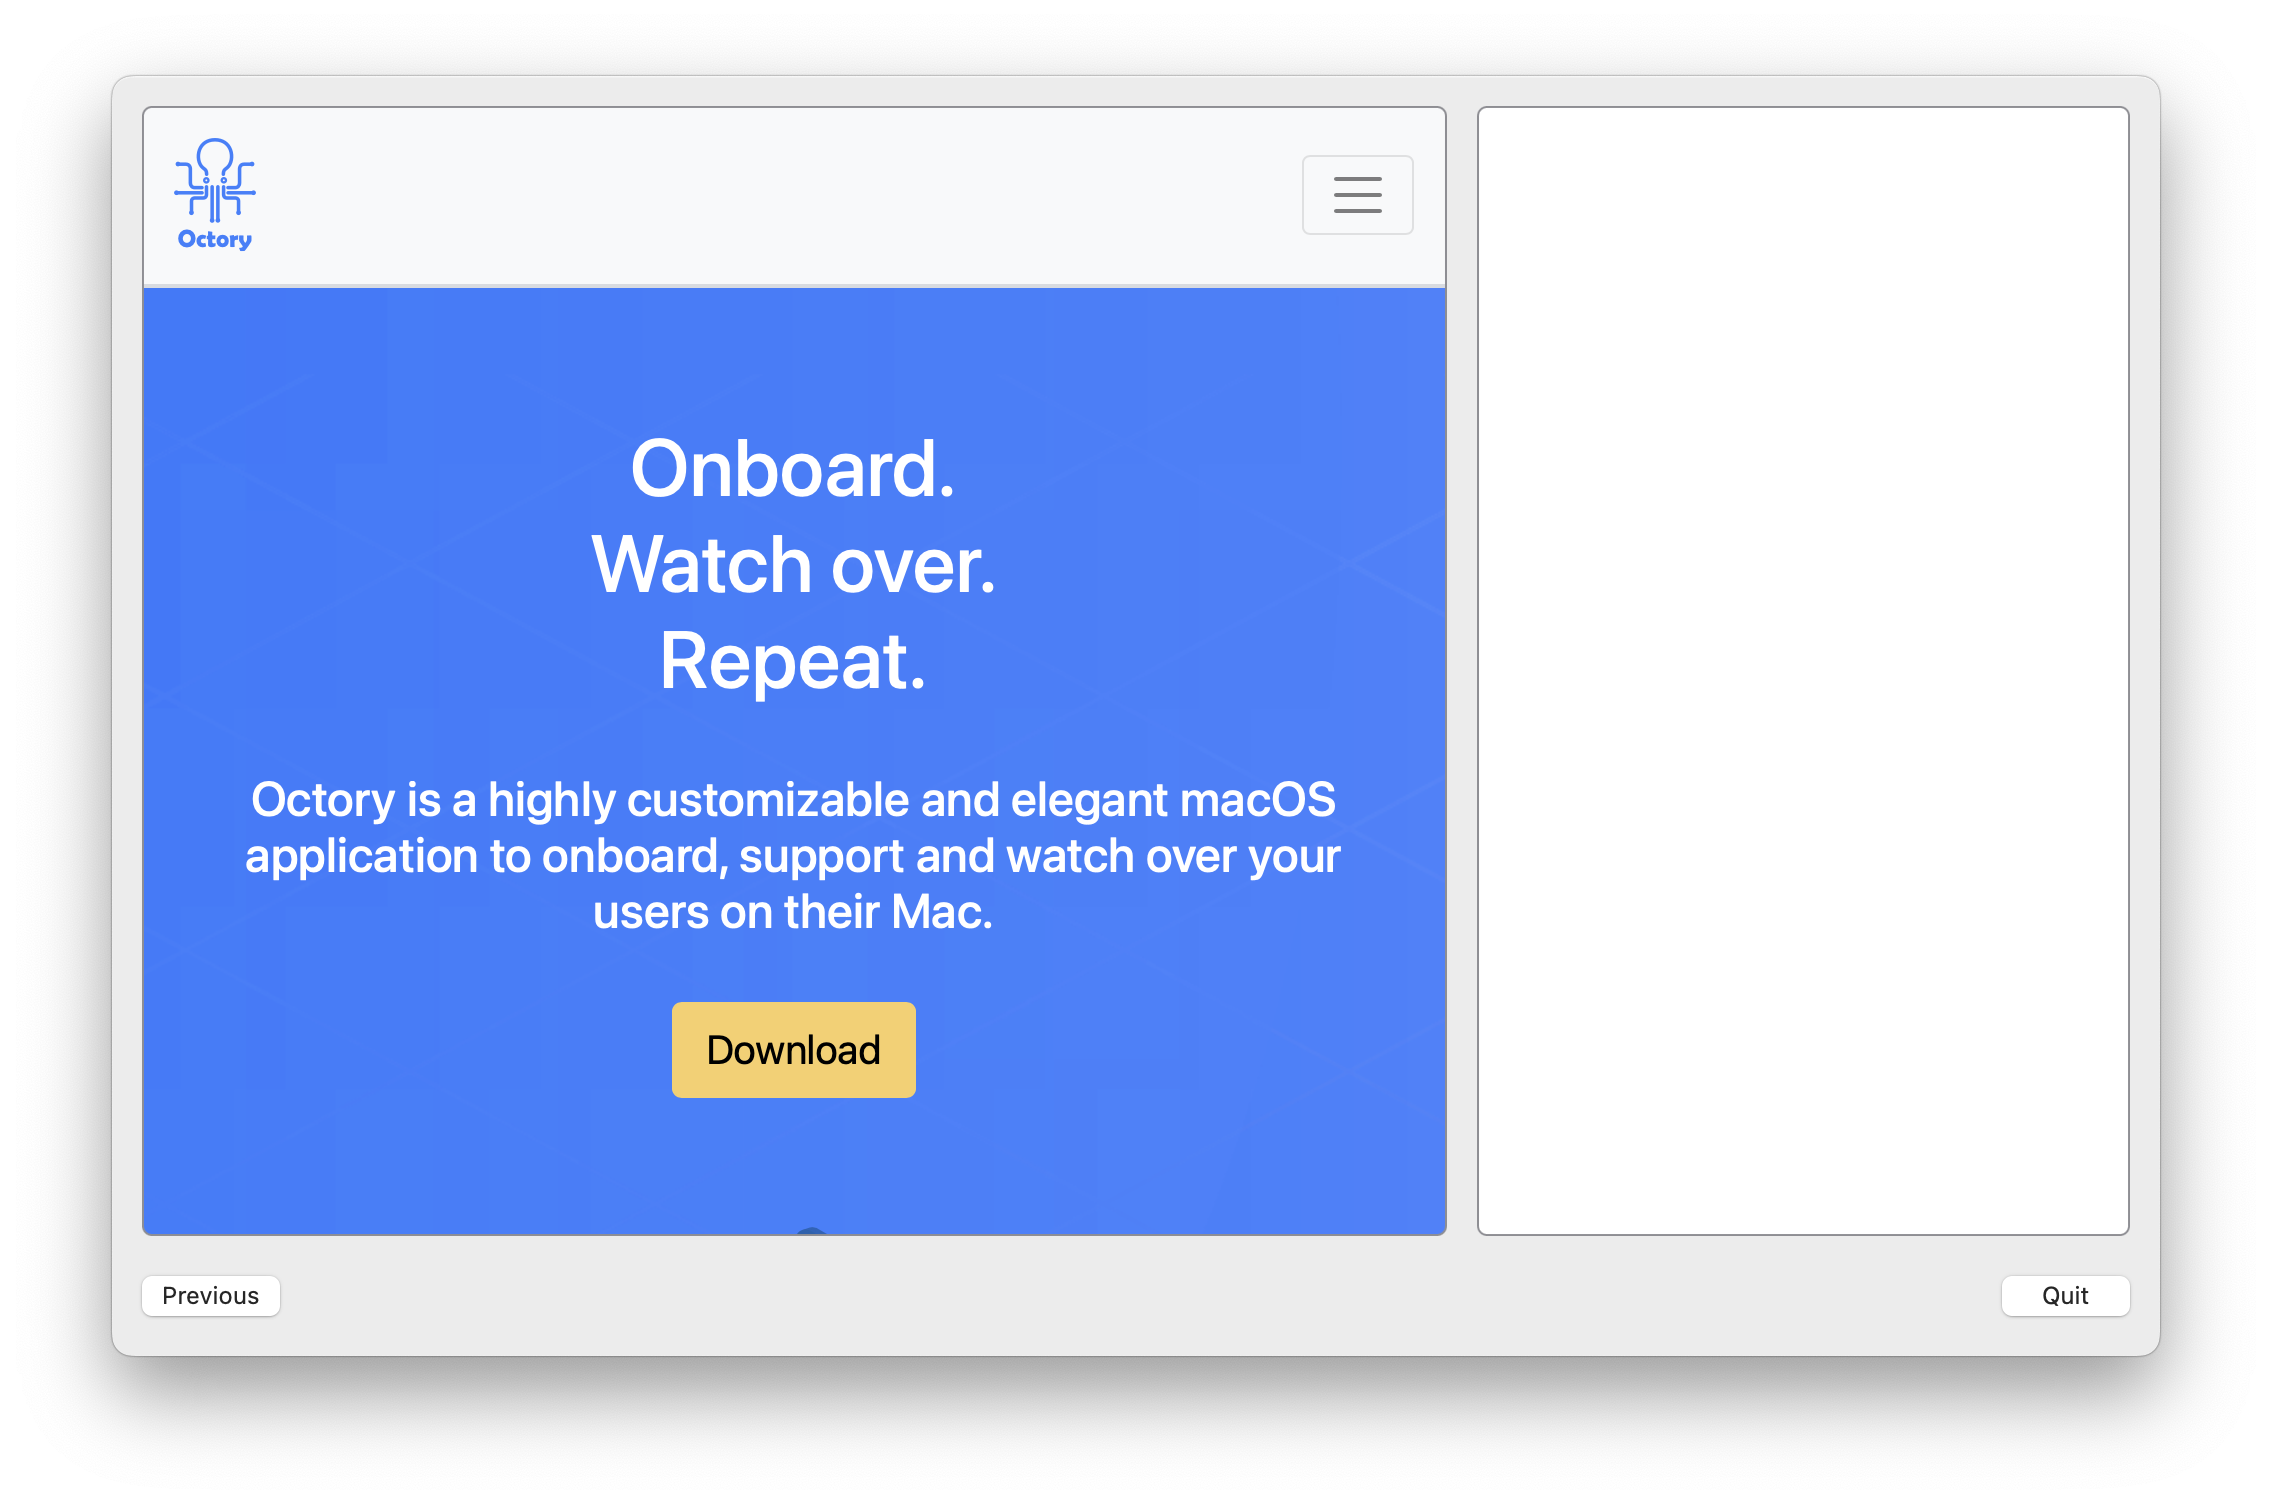
In the first slide, we will present the user with a nice welcome message and the logo of our company.
Instead of using an online URL like we did in Getting Started, we will add our logo directly in our Resources/Images folder.
Start by adding two Spacer components which will allow us to center our other components in the middle of the slide. All other components for this slide will be between those two spacer components.
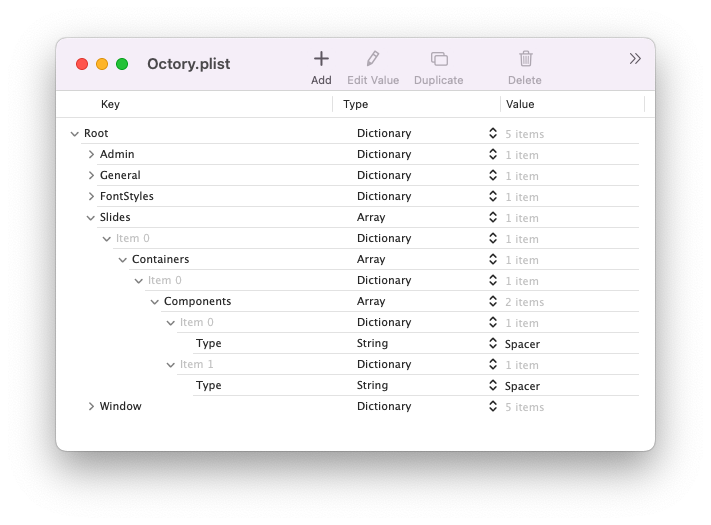
Now add your Image and Text components between the two spacer we just created.
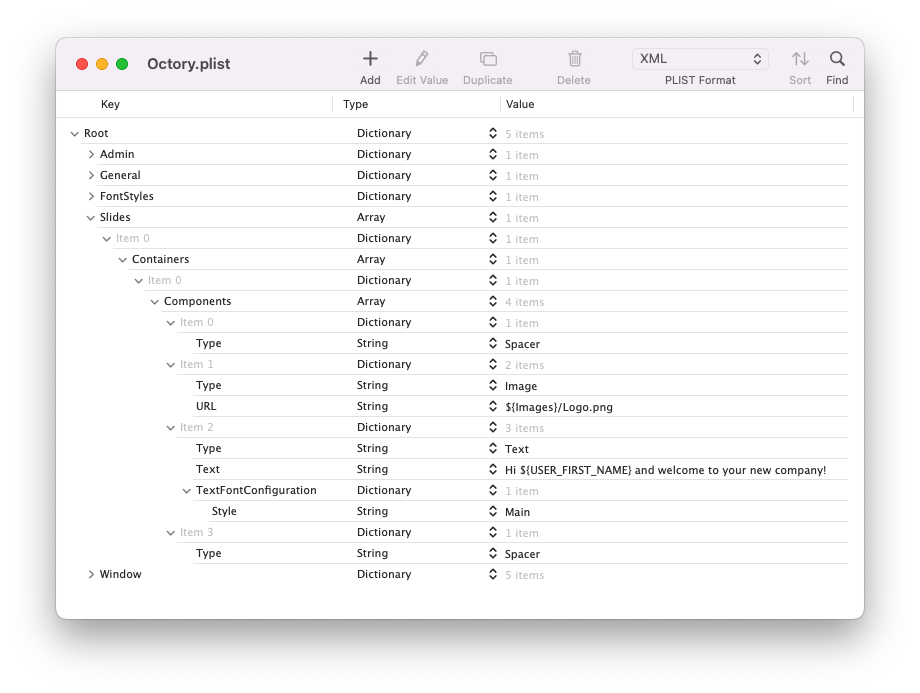
See how we use the global ${USER_FIRST_NAME} variable to customize even further the end-user's experience!
We are also using the TextFontConfiguration key to use our globally defined Main font style.
If you reload Octory or restart it at this point, here is what you should have:
Second slide
Now that we have a nice first intro slide, let's create the rest of our workflow. To do so we will add a new slide with a video.
You have two ways to add your video. You can either give the URL key to an online video or have a local video as part of your resources folder. For this demo, I will be using the latter. I downloaded a video from a online video stock and added it to my resource folder.

For YouTube or other videos hosting website, use the Web component instead and paste the embedded video code in an HTML file.
Create a new slide with the same architecture as the previous one but this time, we will only have one component inside, our video component.
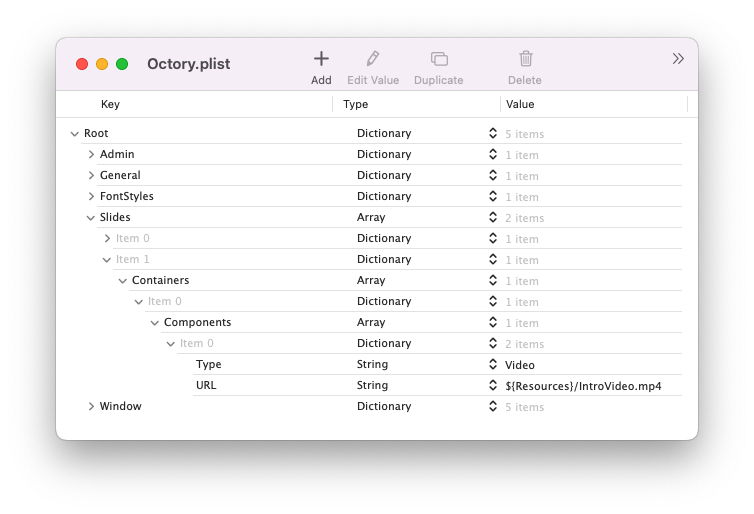
When opening or reloading Octory now, you will see that you have a Next button which will bring your to your video slide.
You may see black parts at the top of bottom of your video if the ratio of your video is different from the one of the Octory window. This is coming from Octory resizing your video to the width of the Octory window.
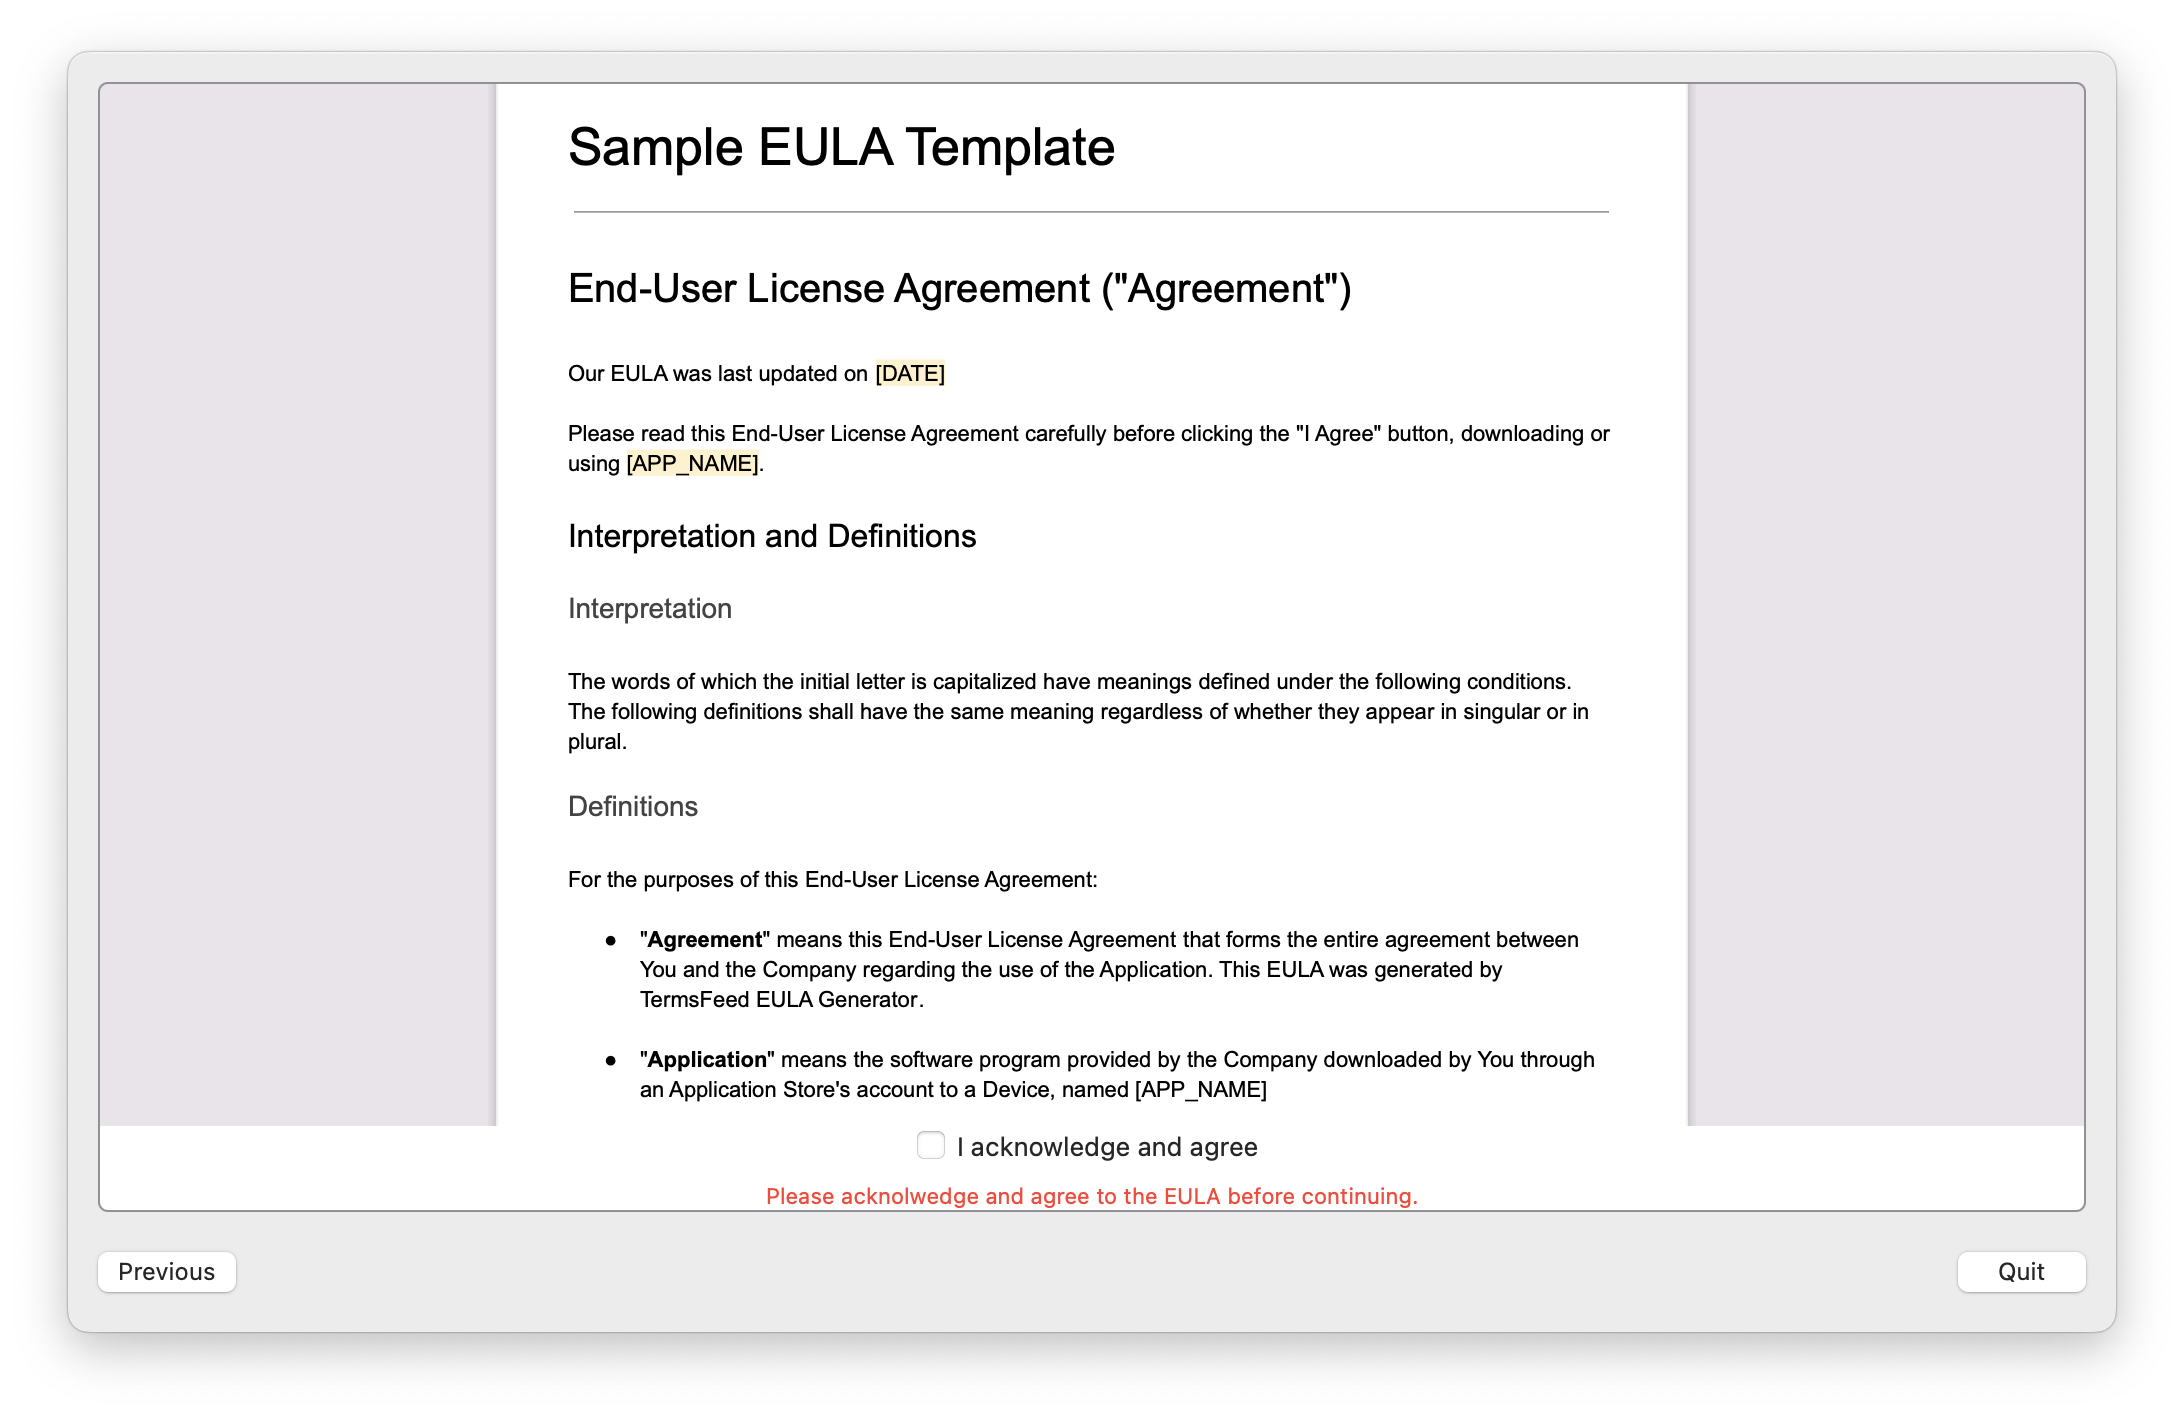
Third slide
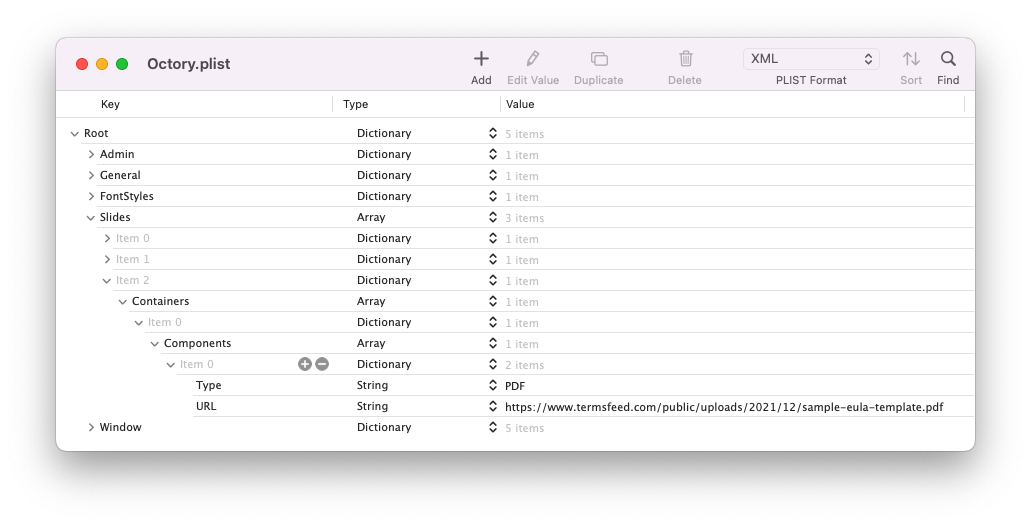
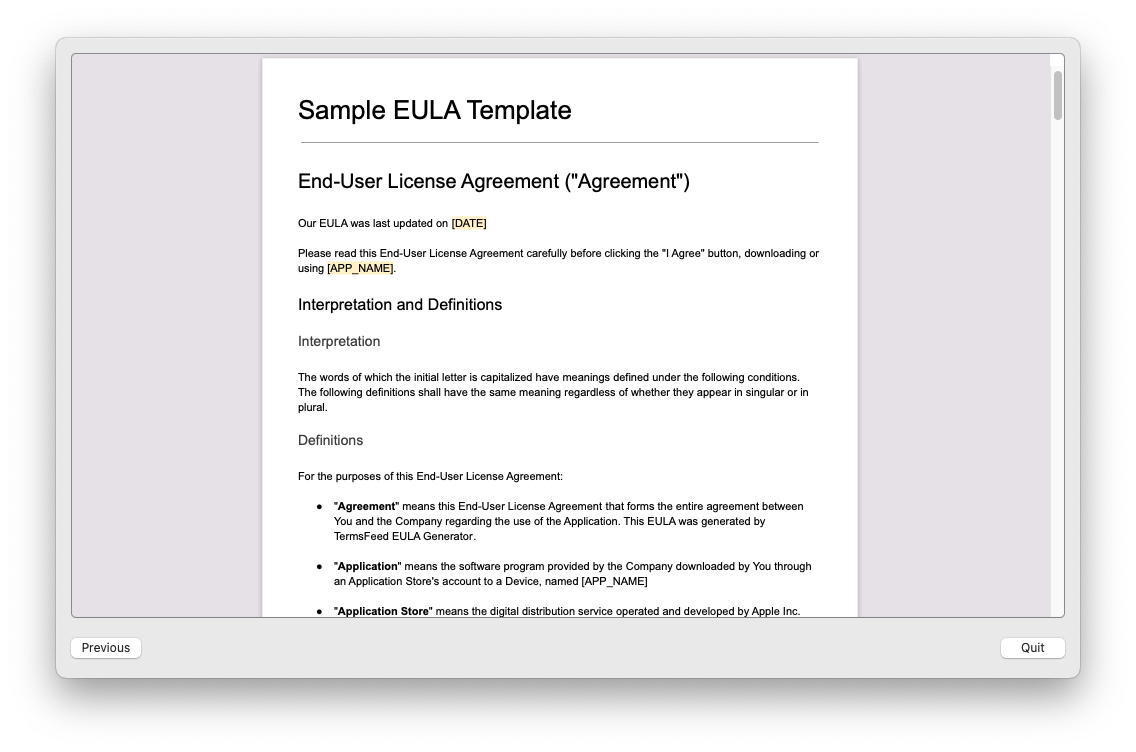
For the third slide, as many organizations have EULA or IT Charter, we will include this directly into our workflow and make sure that our users agree to it before they continue. To do so, we will have two components in this slide. A PDF component, which will display the EULA, and a Checkbox Input component which wiill ensure that the user agrees to the terms before going to the last slide.
Once again, your EULA could be hosted online or locally added to your resources. To change from the second slide, we will use an online PDF.
Create your third slide (you could easily diplicate the second one and remove the video component) and add the PDF component as shown in the image below.
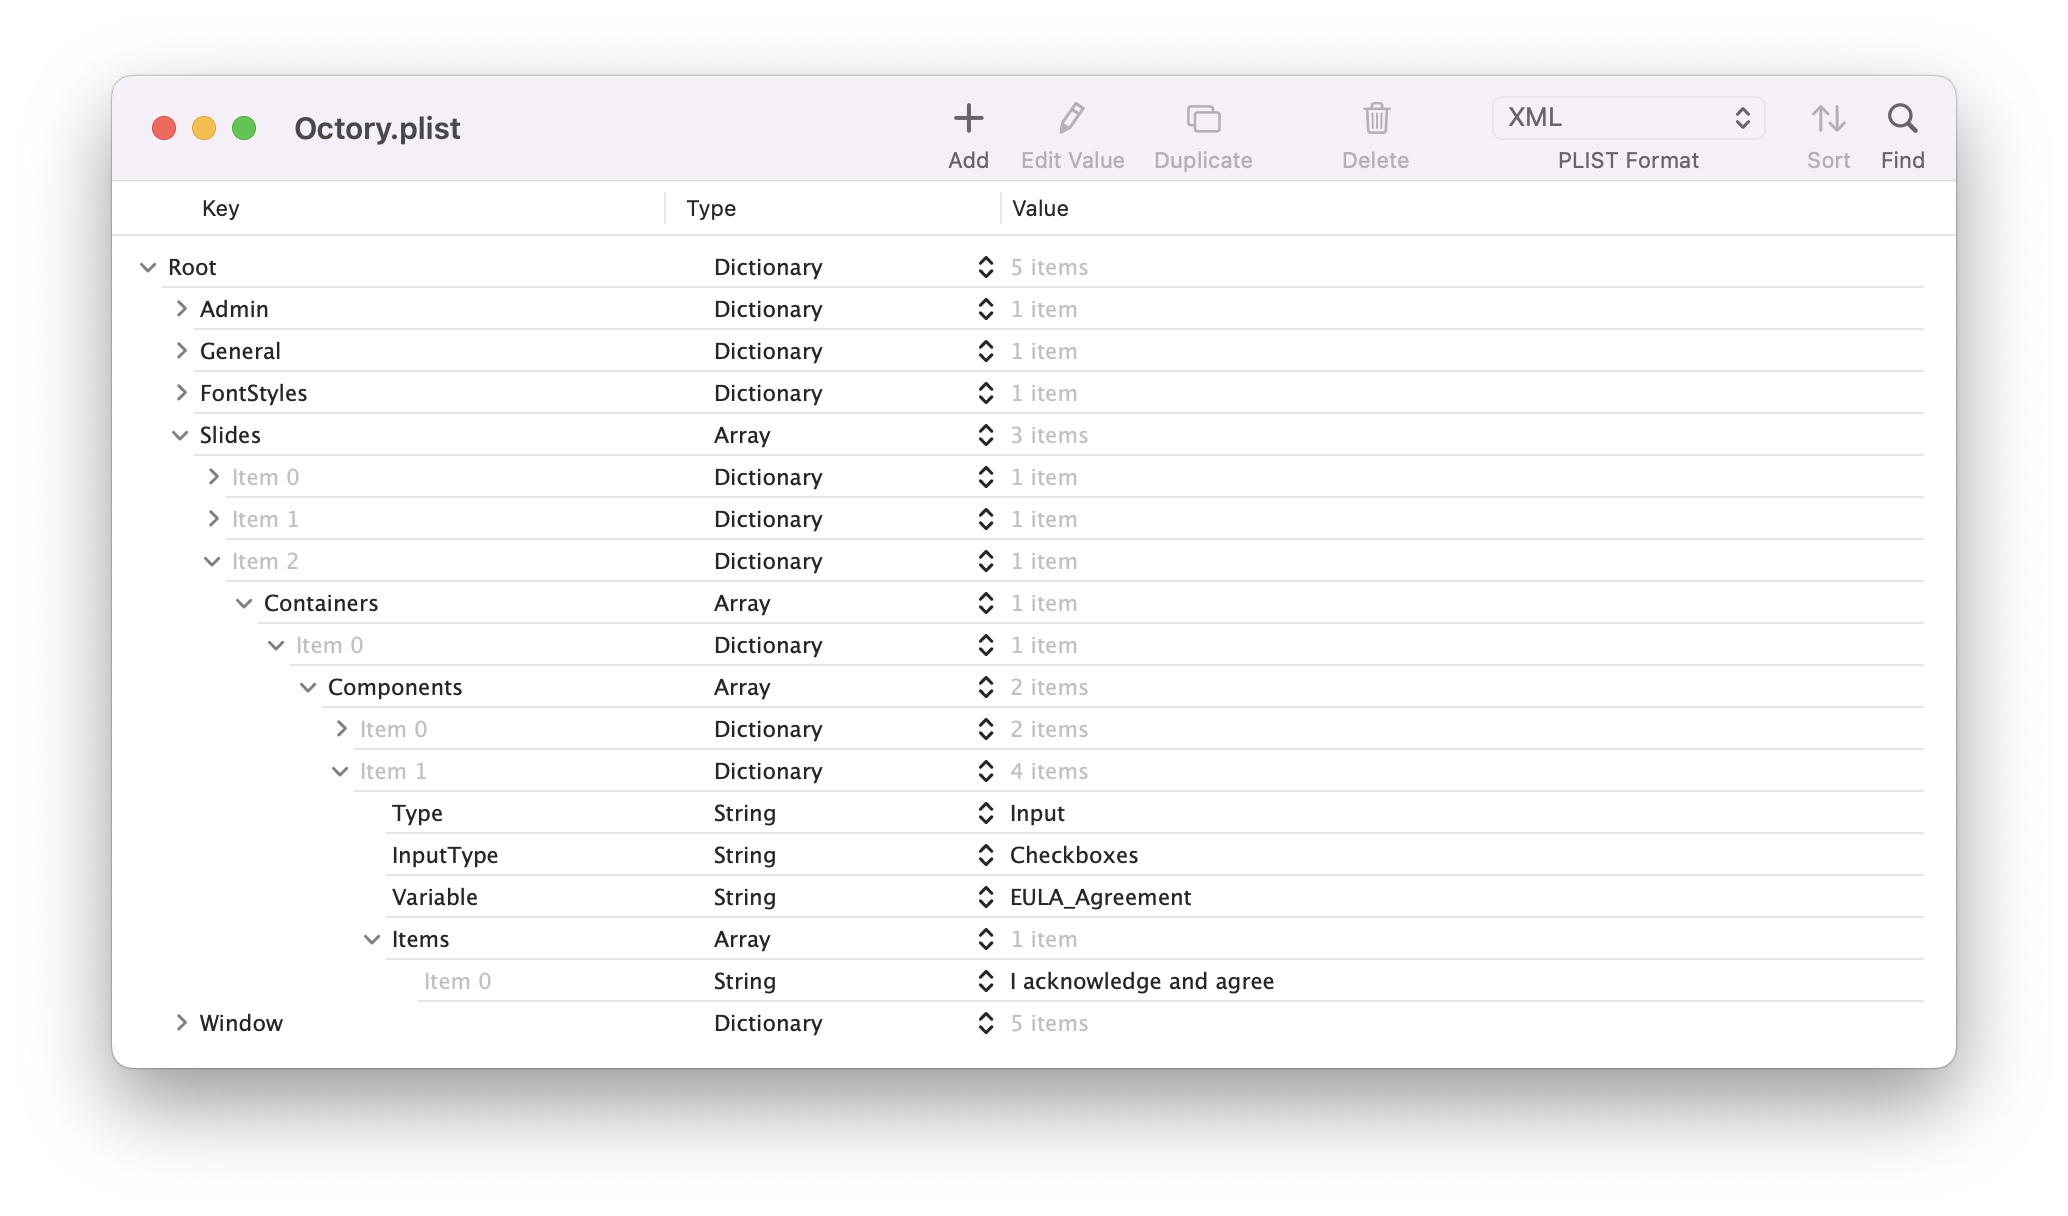
What we want to do now is to have our user agree to the EULA. To do so we will add a checkbox input after our PDF component.
- Add a new component
- Type will be Input
- InputType will be Checkboxes
- Variable is your variable name
- Items array will be our items. In our case we will only have one item.
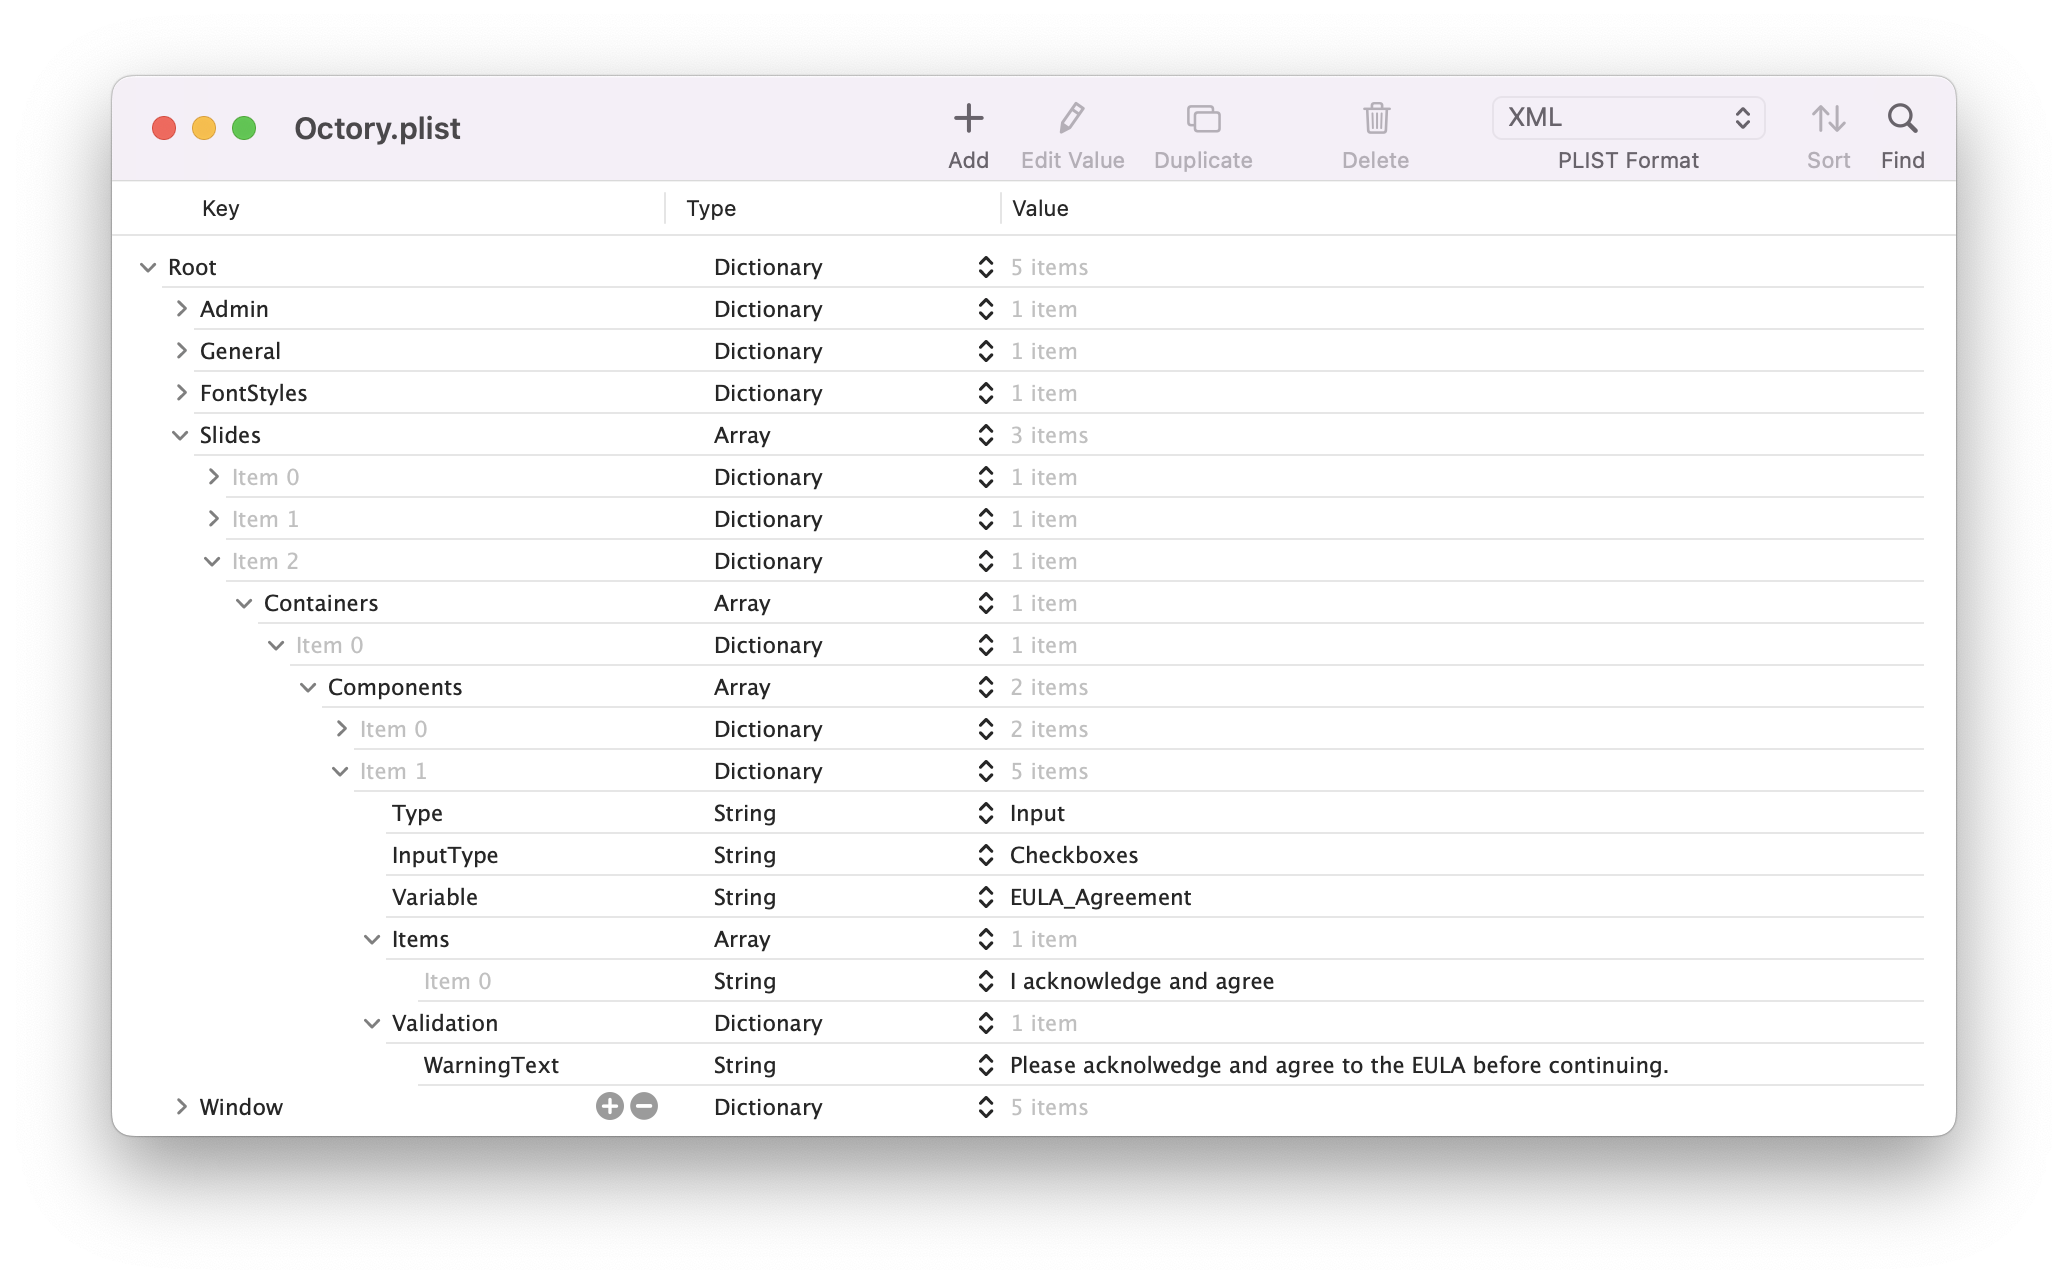
If you reload Octory, you will see that a checkbox appears below our PDF component. But if you test it, you will see that our user still has the capability to quit the app even if the checkbox is not checked. To prevent a user to go to the next slide or quit without checking the checkbox, we will add the Validation dictionary.
So let's add the Validation dictionary with a WarningText key letting our user know that they have to check this box to continue.
To verify or grab the checkbox value for further use, all inputs are saved in /Users/[username]/Octory/Octory_inputs.json by default.
For more information on inputs check the Input configuration.
Fourth slide
Here comes our last slide!
For our forth slide, we will spice things up and add an additional Container.
Create a new slide but this time, instead of one items in the array we will have two.

We want our first container to be large (2/3 of the width), so we will add the IsLarge key. It will have only one component which will be a Web component displaying our website.
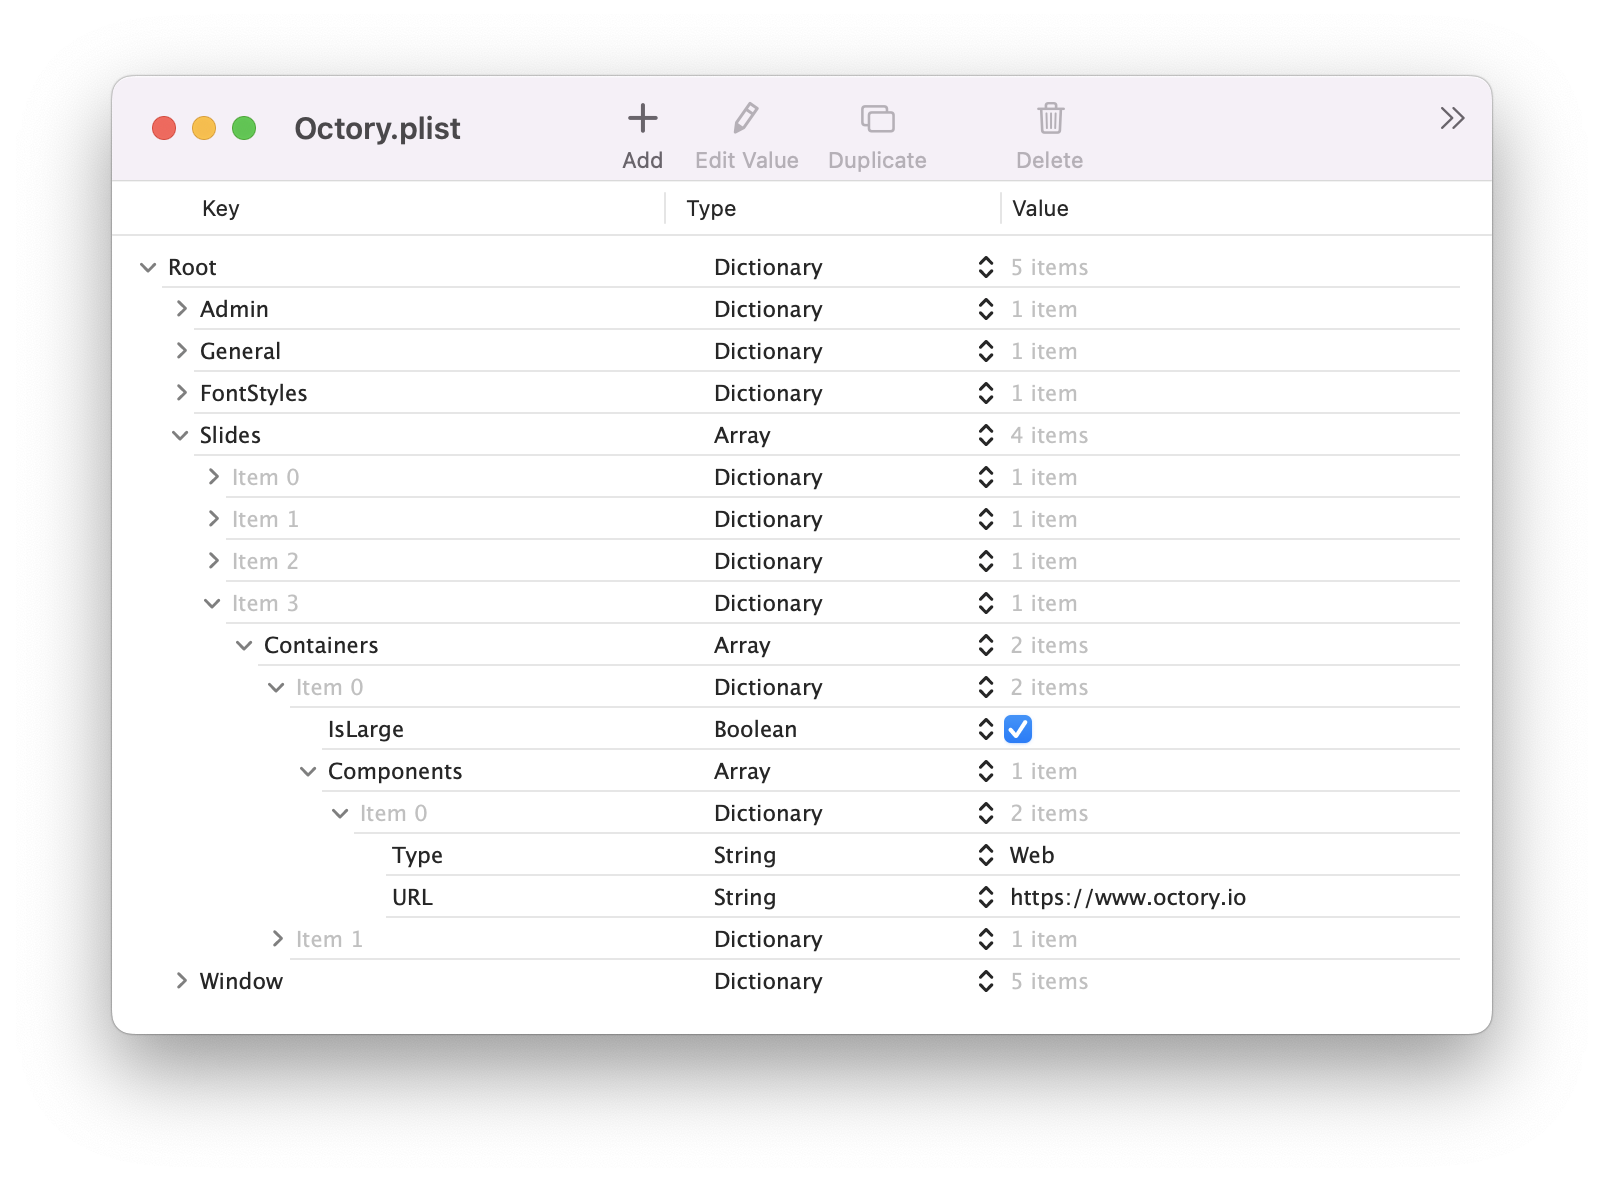
Our second container will also include only one component which will be our app monitors.
If you try to launch Octory at this point, you will see that nothing appears in the monitor component. This is all because we did not define any monitor. We only told Octory to display the component MonitorsDisplay.
Create our monitors
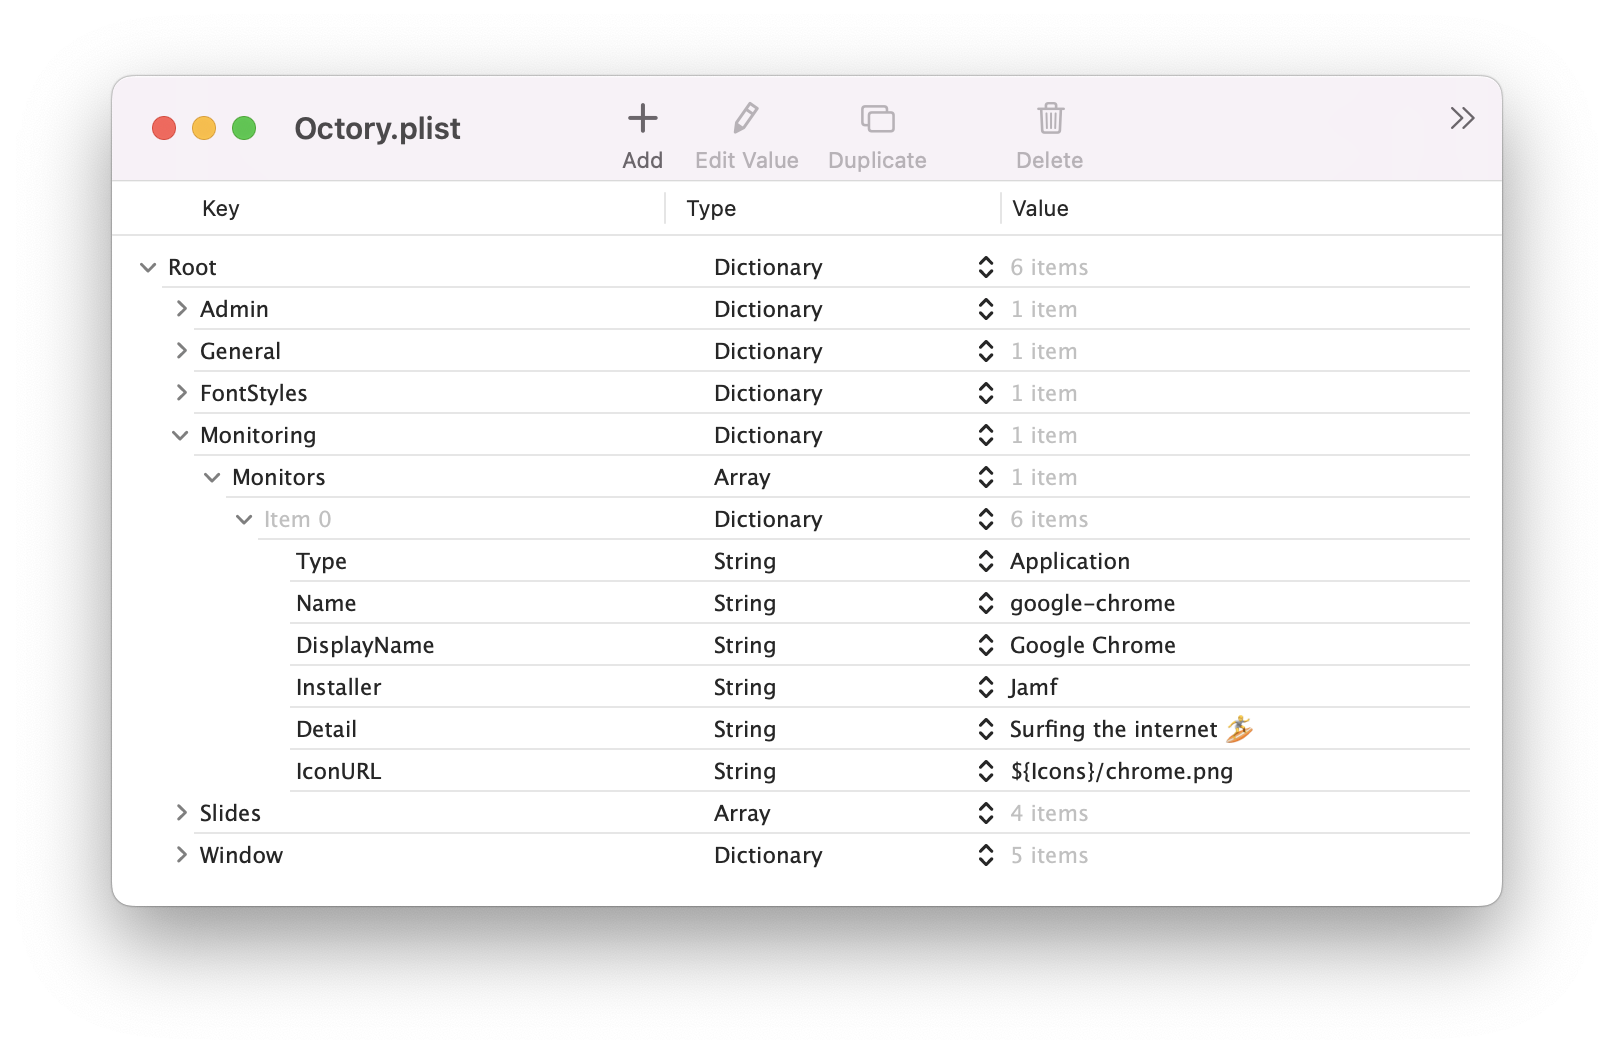
So let's create our monitors! Octory can fully monitor Jamf, Workspace ONE (Airwatch), Munki and Apps & Books (VPP) packages by default but can extend to any MDM using the Octo-Notifier command line tool using scripts or if you only monitor Apps in the system Application folder. First, we want nice icons for our monitors so let's add our icons in our Resources/Icons folder. In our case, we will have three monitors (Chrome, Zoom, Slack).
The screenshot shows PNG icons but Octory handles ICNS icons too.

Second, in our plist, we will add a Monitoring key with an array of Monitors. Each monitors have a wide range of possibilities. We will start with Chrome and set the following keys:
Name: The package name (google-chrome in our case)DisplayName: Name as it will appear in the MonitorsDisplay componentInstaller: Jamf (all possible installers can be found here)Detail: A subtext to be displayedIconURL: The path to our icon
You do not need specify the full package name. In the back, Octory is running a regex which looks for the package starting with the value of the Name key.
For example, if your package is named google-chrome-3.2.5.pkg, you can only specify google-chrome in the Name so when you update that package to a newer version, Octory's configuration still works.
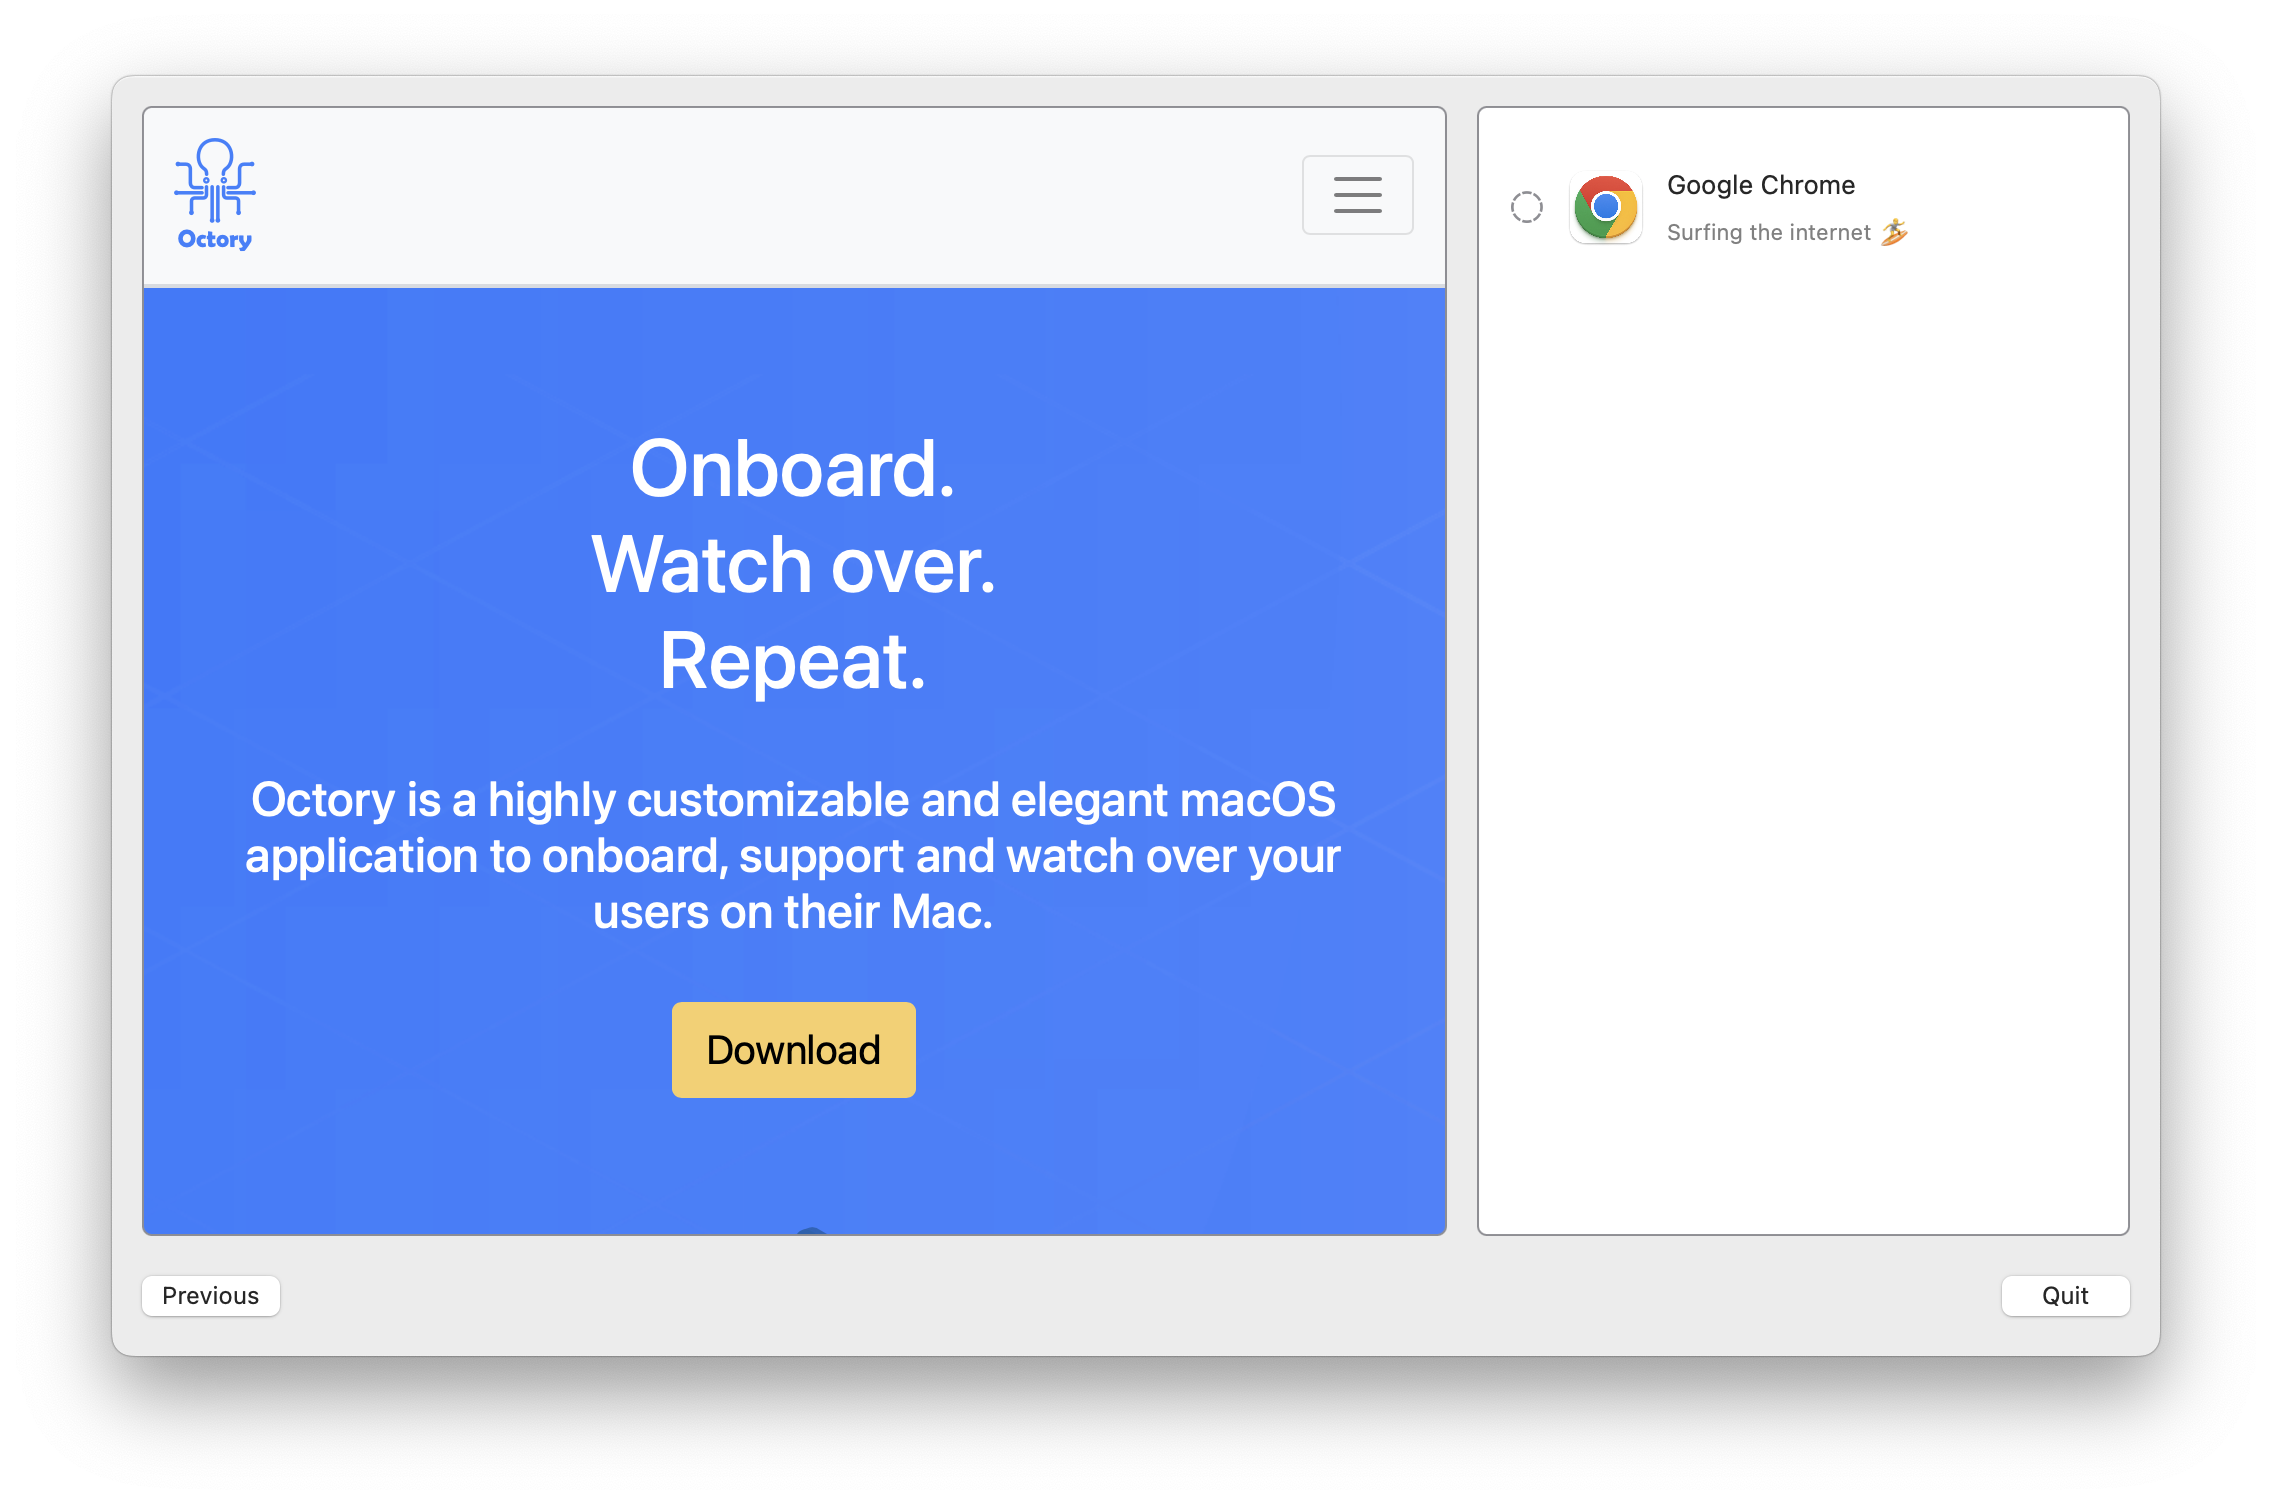
You can now relaunch Octory and Google Chrome will be present in the list of monitors.
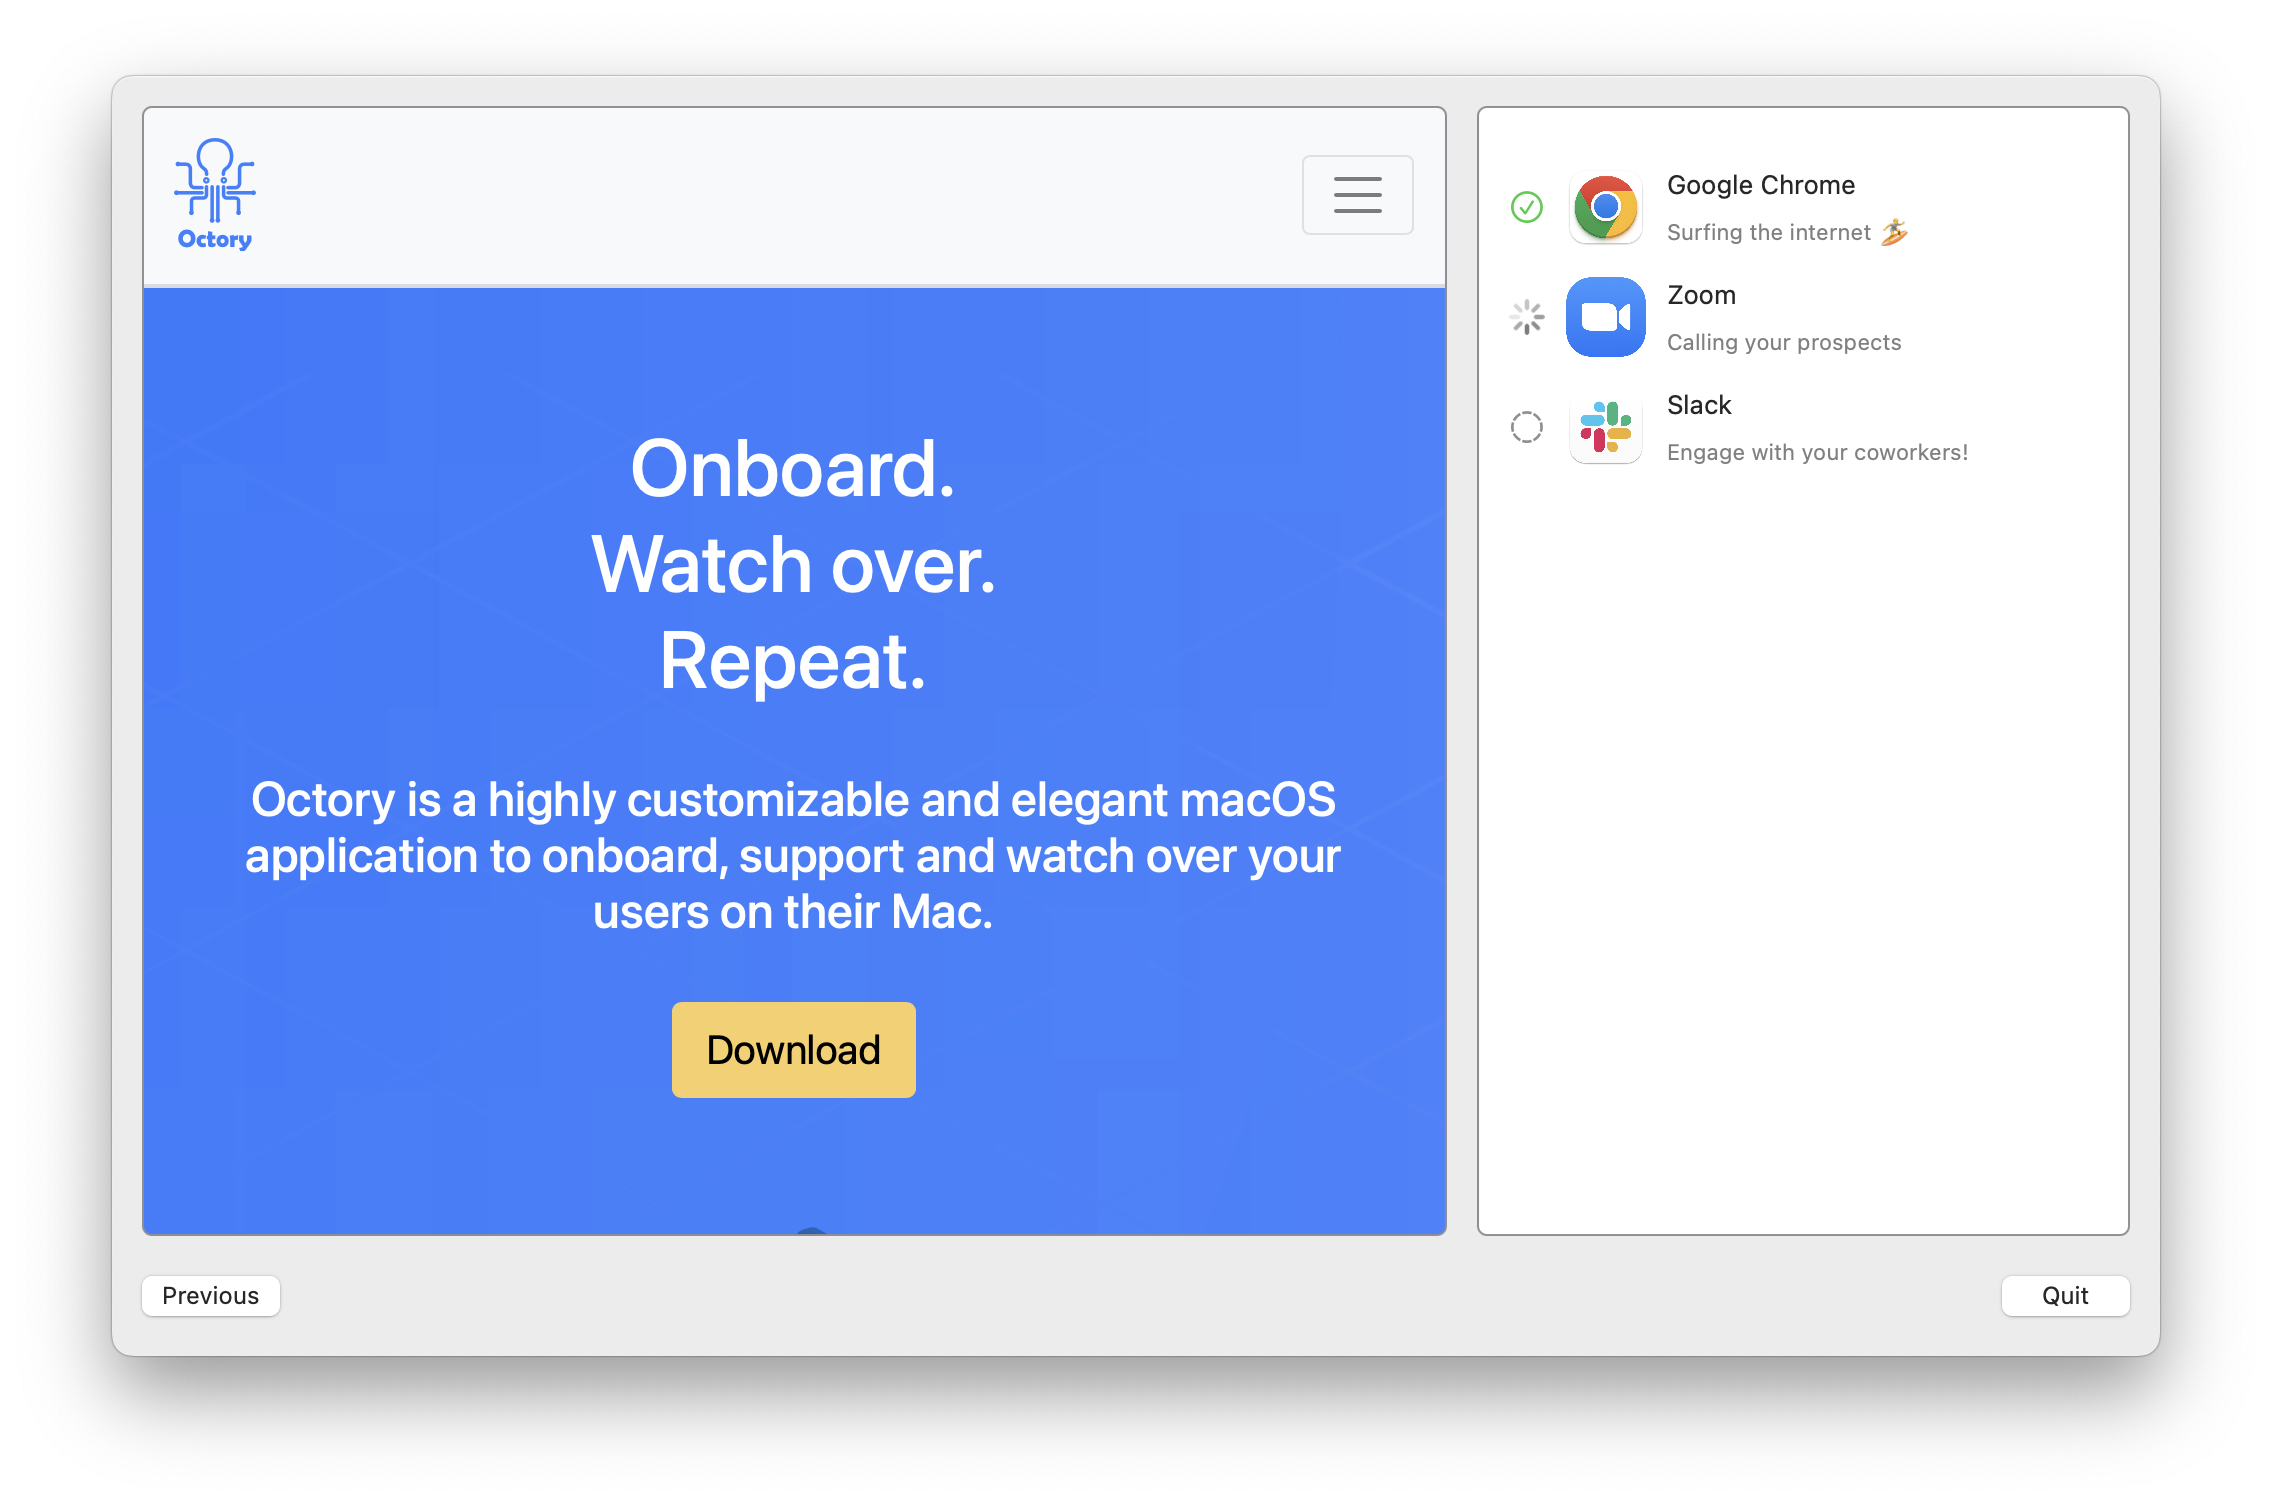
Repeat this for all your monitors and you are done!
Octory can simulate the installation of your packages. To do so, look at the menu bar and click on Admin > Start monitoring simulation
Termination Script
At the end of your workflow, Octory gives you the possibility to run a termination script. It alllows you to finalize your workflow with a nice restart for example (you could imagine whatever you want).
Create your script and copy it in the Resources/Scripts folder.
#!/bin/zsh
# To be executed when Octory has just succesffully completed

# Grab logged in user
currentUser=$( echo "show State:/Users/ConsoleUser" | scutil | awk '/Name :/ && ! /loginwindow/ { print $3 }' )

# Trigger Restart with user confirmation.
/usr/bin/sudo -u "$currentUser" /usr/bin/osascript -e 'tell application "loginwindow" to «event aevtrrst»'

exit 0
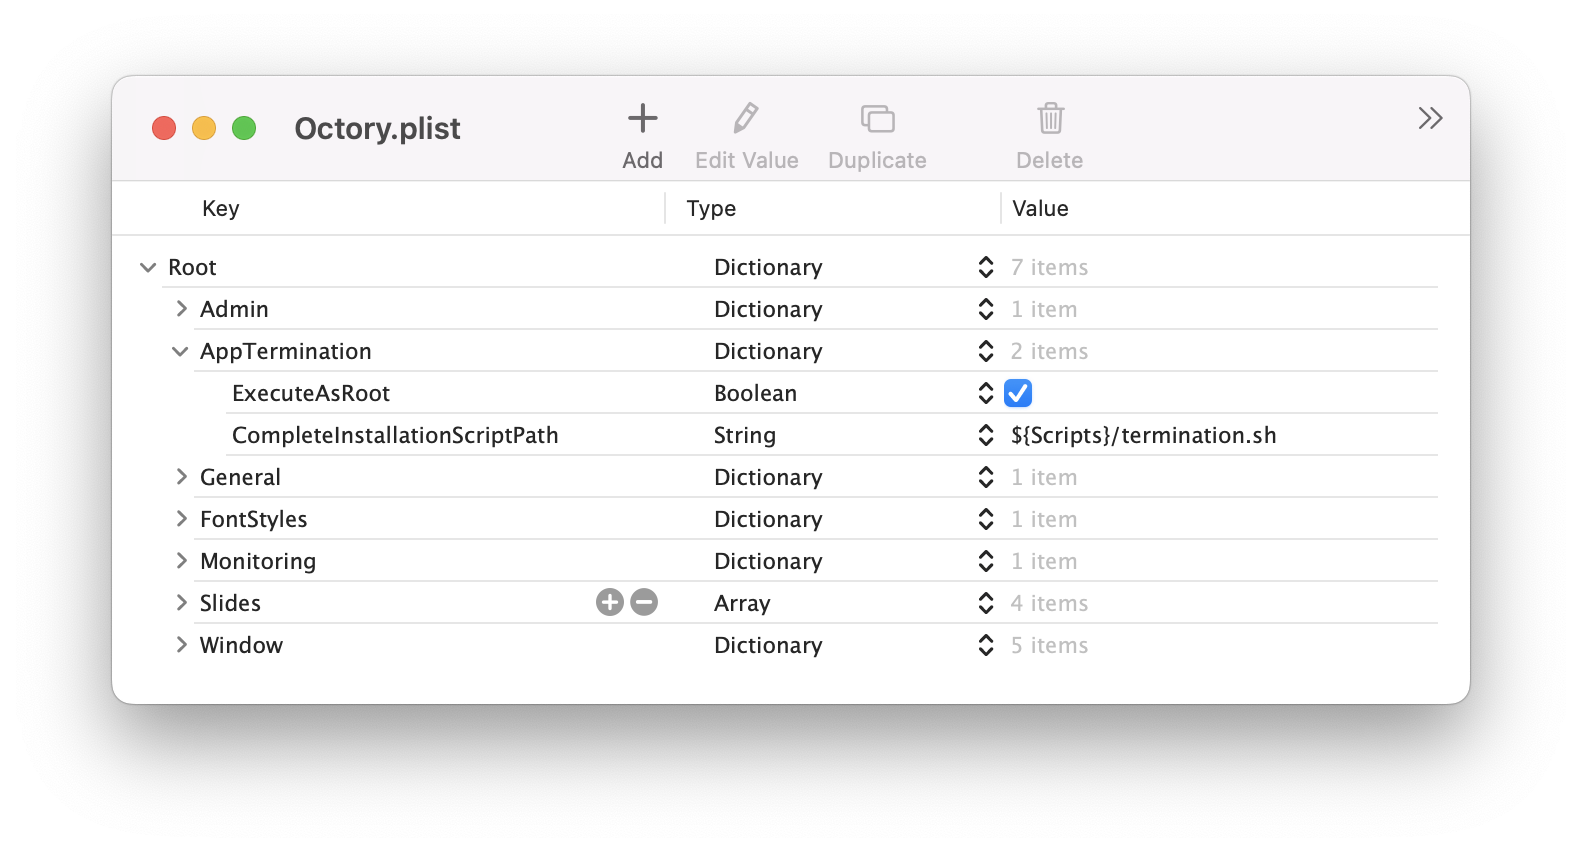
Back to our configuration file, add a new AppTermination key at the root level.
- Create an
ExecuteAsRootkey as true - Create a
CompleteInstallationScriptPathkey with the path to our script
Be careful, next time you launch Octory, when clicking on "Quit", your computer will restart.
Final Result
Congratulations! You reached the end of this tutorial.
Feel free to copy/paste the final configuration and test it out.
<?xml version="1.0" encoding="UTF-8"?>
<!DOCTYPE plist PUBLIC "-//Apple//DTD PLIST 1.0//EN" "http://www.apple.com/DTDs/PropertyList-1.0.dtd">
<plist version="1.0">
<dict>
	<key>Admin</key>
	<dict>
		<key>IsAdminModeEnabled</key>
		<true/>
	</dict>
	<key>AppTermination</key>
	<dict>
		<key>ExecuteAsRoot</key>
		<true/>
		<key>CompleteInstallationScriptPath</key>
		<string>${Scripts}/termination.sh</string>
	</dict>
	<key>General</key>
	<dict>
		<key>Variables</key>
		<dict>
			<key>Icons</key>
			<string>${Resources}/Icons</string>
			<key>Images</key>
			<string>${Resources}/Images</string>
			<key>Resources</key>
			<string>${OCTORY_DIRECTORY}/Resources</string>
			<key>Scripts</key>
			<string>${Resources}/Scripts</string>
		</dict>
	</dict>
	<key>FontStyles</key>
	<dict>
		<key>Main</key>
		<dict>
			<key>TextAlignment</key>
			<string>Center</string>
			<key>Size</key>
			<integer>30</integer>
		</dict>
	</dict>
	<key>Monitoring</key>
	<dict>
		<key>Monitors</key>
		<array>
			<dict>
				<key>Type</key>
				<string>Application</string>
				<key>Name</key>
				<string>google-chrome</string>
				<key>DisplayName</key>
				<string>Google Chrome</string>
				<key>Installer</key>
				<string>Jamf</string>
				<key>Detail</key>
				<string>Surfing the internet 🏄</string>
				<key>IconURL</key>
				<string>${Icons}/chrome.png</string>
			</dict>
			<dict>
				<key>Type</key>
				<string>Application</string>
				<key>Name</key>
				<string>zoom</string>
				<key>DisplayName</key>
				<string>Zoom</string>
				<key>Installer</key>
				<string>Jamf</string>
				<key>Detail</key>
				<string>Calling your prospects</string>
				<key>IconURL</key>
				<string>${Icons}/zoom.png</string>
			</dict>
			<dict>
				<key>Type</key>
				<string>Application</string>
				<key>Name</key>
				<string>slack</string>
				<key>DisplayName</key>
				<string>Slack</string>
				<key>Installer</key>
				<string>Jamf</string>
				<key>Detail</key>
				<string>Engage with your coworkers!</string>
				<key>IconURL</key>
				<string>${Icons}/slack.png</string>
			</dict>
		</array>
	</dict>
	<key>Slides</key>
	<array>
		<dict>
			<key>Containers</key>
			<array>
				<dict>
					<key>Components</key>
					<array>
						<dict>
							<key>Type</key>
							<string>Spacer</string>
						</dict>
						<dict>
							<key>Type</key>
							<string>Image</string>
							<key>URL</key>
							<string>${Images}/Logo.png</string>
						</dict>
						<dict>
							<key>Type</key>
							<string>Text</string>
							<key>Text</key>
							<string>Hi ${USER_FIRST_NAME} and welcome to your new company!</string>
							<key>TextFontConfiguration</key>
							<dict>
								<key>Style</key>
								<string>Main</string>
							</dict>
						</dict>
						<dict>
							<key>Type</key>
							<string>Spacer</string>
						</dict>
					</array>
				</dict>
			</array>
		</dict>
		<dict>
			<key>Containers</key>
			<array>
				<dict>
					<key>Components</key>
					<array>
						<dict>
							<key>Type</key>
							<string>Video</string>
							<key>URL</key>
							<string>${Resources}/IntroVideo.mp4</string>
						</dict>
					</array>
				</dict>
			</array>
		</dict>
		<dict>
			<key>Containers</key>
			<array>
				<dict>
					<key>Components</key>
					<array>
						<dict>
							<key>Type</key>
							<string>PDF</string>
							<key>URL</key>
							<string>https://www.termsfeed.com/public/uploads/2021/12/sample-eula-template.pdf</string>
						</dict>
						<dict>
							<key>Type</key>
							<string>Input</string>
							<key>InputType</key>
							<string>Checkboxes</string>
							<key>Variable</key>
							<string>EULA_Agreement</string>
							<key>Items</key>
							<array>
								<string>I acknowledge and agree</string>
							</array>
							<key>Validation</key>
							<dict>
								<key>WarningText</key>
								<string>Please acknolwedge and agree to the EULA before continuing.</string>
							</dict>
						</dict>
					</array>
				</dict>
			</array>
		</dict>
		<dict>
			<key>Containers</key>
			<array>
				<dict>
					<key>IsLarge</key>
					<true/>
					<key>Components</key>
					<array>
						<dict>
							<key>Type</key>
							<string>Web</string>
							<key>URL</key>
							<string>https://www.octory.io</string>
						</dict>
					</array>
				</dict>
				<dict>
					<key>Components</key>
					<array>
						<dict>
							<key>Type</key>
							<string>MonitorsDisplay</string>
						</dict>
					</array>
				</dict>
			</array>
		</dict>
	</array>
	<key>Window</key>
	<dict>
		<key>OnScreen</key>
		<string>Simple</string>
		<key>IsTitleBarHidden</key>
		<true/>
		<key>IsMovable</key>
		<false/>
		<key>Position</key>
		<dict>
			<key>Vertical</key>
			<string>Center</string>
			<key>Horizontal</key>
			<string>Center</string>
		</dict>
		<key>MinimumSize</key>
		<dict>
			<key>Height</key>
			<integer>640</integer>
			<key>Width</key>
			<integer>1024</integer>
		</dict>
	</dict>
</dict>
</plist>